API Security

Modern-day APIs are the building block for integration and application for any organization. Every day organizations are using APIs to unlock new features and enable innovation. From banks, retail, and transportation to IoT, autonomous vehicles, and smart cities, APIs are a critical part of modern mobile, SaaS, and web applications and can be found in customer-facing, partner-facing, and internal applications.

Organizations are exposing sensitive data, such as Personally Identifiable Information (PII) through APIs, and because of this have increasingly become a target for attackers. Due to this organizations are concerned about their API security & compliance. API Security focuses on strategies and solutions to understand and mitigate the unique vulnerabilities and security risks of Application Programming Interfaces (APIs). According to the Open Web Application Security Project (OWASP) 2023, these API threats are categorized into 10 different categories

  1. Broken Object Level Authorization (BOLA) – Object-level authorization is an access control mechanism that is usually implemented at the code level to validate that a user can only access the objects that they should have permission to access.
    Comparing the user ID of the current session (e.g. by extracting it from the JWT token) with the vulnerable ID parameter isn’t a sufficient solution to solve Broken Object Level Authorization (BOLA).

    For example, any API providing a listing of all school revenue based on the school’s name of any county could be a security threat like this API endpoint: /county/{schoolName}/revenues.
    Hacker simply manipulates {schoolName} in the above endpoint’s school name to get all revenue details for all schools.

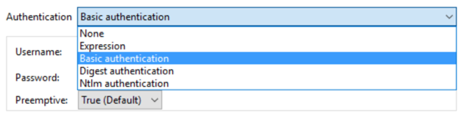
    To mitigate this risk Use the authorization mechanism to check if the logged-in user has access to perform the requested action on the record in every function that uses an input from the client to access a record in the database.
  2. Broken Authentication – API authentication is very vulnerable and an easy target for attackers. Attackers can gain complete control of other users’ accounts in the system, read their personal data, and perform sensitive actions on their behalf.

    API authentication flow and process need to be well protected and “Forgot password / reset password” should be treated the same way as authentication mechanisms. Make sure you know all possible flows to authentication to API (Mobile/Web/any link) and it gets well protected with authentication.
  3. Broken Object Property Level Authorization – When authorizing a user to access an object using an API endpoint, It is very important to validate that the user has permission to access the specific or all object properties.
    An API endpoint is considered as vulnerable if :
    • The API endpoint exposes properties of an object that are considered sensitive and should not be read by the user.
    • The API endpoint allows a user to change, add/or delete the value of a sensitive object’s property which the user should not be able to access.

      When you are exposing any API endpoint, always make sure that the user has access to the object’s properties you expose and avoid using any generic methods like to_json() and to_string().
  4. Unrestricted Resource Consumption – Enabling any API request, requires resources such as network bandwidth, CPU, memory, and storage. These resources have limited bandwidth and money associated with these resources.

    It is easy to exploit these resources by simple API calls or multiple concurrent requests. An API is vulnerable if at least one of the following limits is missing or set inappropriately.
    • Execution timeouts
    • Maximum allowable memory
    • Maximum number of file descriptors
    • Maximum number of processes
    • Maximum upload file size
    • Number of operations to perform in a single API client request (e.g. GraphQL batching)
    • Number of records per page to return in a single request-response
    • Third-party service providers’ spending limit
  5. Broken Function Level Authorization If any of the administrative API flows like delete, update, or create expose to unauthorized users it will be an easily vulnerable API endpoint. The best way to find broken function level authorization issues is to perform a deep analysis of the authorization mechanism while keeping in mind the user hierarchy, different roles or groups in the application, and asking the following questions:
    • Can a regular user access the administrative endpoint?
    • Can a user perform sensitive actions (e.g. creation, modification, or deletion) that they should not have access to by simply changing the HTTP method (e.g. from GET to DELETE)?
    • Can a user from Group X access a function that should be exposed only to users from Group Y, by simply guessing the endpoint URL and parameters?

      To mitigate this risk, the enforcement mechanism(s) must deny all access by default, requiring explicit grants to specific roles for access to every function.
  6. Unrestricted Access to Sensitive Business Flows — When you create an API endpoint some endpoints are more sensitive and critical than others. It is very important to understand which API endpoint and business flow you are exposing to the customer. Any restricted business flow exposed to clients can harm your business. In general, technical impact is not very severe but business impact might hurt your company’s credibility.

    For example, if your company offers a discount for one customer 20% and another customer 30% through API, if the first customer knows this discount variation, it will impact the credibility of the company as well as revenue loss.
    The mitigation planning should be done in two layers:
    • Business – identify the business flows that might harm the business if they are excessively used.
    • Engineering – choose the right protection mechanisms to mitigate the business risk.
  7. Server-Side Request Forgery – Server-Side Request Forgery (SSRF) vulnerability occurs when you are consuming remote APIs and resources without validating the remote endpoint or user-supplied URL. SSRF enables attackers to force the application to send formatted requests to an unknown destination even if protected by a firewall. Successful exploitation might lead to internal services enumeration (e.g. port scanning), information disclosure, bypassing firewalls, or other security mechanisms.

    The SSRF risk cannot be eliminated but you can mitigate these risks by isolating the resource fetching mechanism in your network, accepting media types for a given functionality, disabling HTTP redirections, Validating and sanitizing all client-supplied input data, and Using a well-tested and maintained URL parser to avoid issues caused by URL parsing inconsistencies.
  8. Security Misconfiguration — Security Misconfiguration vulnerability occurs when the latest patches are missing on the server or systems are outdated, Transport Layer Security (TLS) is missing, A Cross-Origin Resource Sharing (CORS) policy is missing, Error messages include stack traces or expose other sensitive information. Attackers often attempt to find unpatched flaws, common endpoints, services running with insecure default configurations, or unprotected files and directories to gain unauthorized access or knowledge of the system. These Security misconfigurations not only expose sensitive user data but also system details that can lead to full server compromise.

    Security misconfiguration risk can be mitigated by a repeating hardening process leading to fast and easy deployment, ensuring all communication happens over an encrypted communication channel (TLS), and implementing a proper Cross-Origin Resource Sharing (CORS) policy.
  9. Improper Inventory Management — It is important for organizations not only to have a good understanding and visibility of their own APIs and API endpoints but also how the APIs are storing or sharing data with external third parties. Multiple versions of APIs need to be properly managed, secure, patched and well-documented. Hackers usually get unauthorized access through old API versions or endpoints left running unpatched and using weaker security. requirements.
    Improper Inventory Management security vulnerability can be mitigated by documenting all hosted APIs for all environments (Prod or Non-Prod), Generating documentation automatically by adopting open standards and avoiding using production data with non-production API deployments.
  10. Unsafe Consumption of APIs — Unsafe Consumption of APIs vulnerability occurs when your developers tend to adopt weaker security standards, for instance, in regard to input validation, sanitization, URL redirections and not implementing timeouts for interactions with third-party services.
    This vulnerability can be mitigated by implementing proper data validation, and schema validation. Ensuring all API interaction happens on secured communication channels like TLS. Maintain an allowlist of well-known locations integrated APIs may redirect yours to do not blindly follow redirects.

Generative AI: How API making powerful customer experiences

Generative AI is more like a child where you instruct child that don’t bounce basketball inside home, but child goes to bounce a soccer ball inside home. But this was not your expectation from child and then this action falls outside of your expectation. Now you add more parameters with your instruction then the child is more likely to get the response that you want.

Generative AI is the same, the more context and parameter we can give to generative AI the better our service replies, the better emails, the better product recommendations get from your Generative AI Models.

We’re all seeing some amazing demos of generative AI these days. Models trained on the whole internet are able to hold a conversation, explain their reasoning, and perform well at a broad variety of tasks.

You’ve probably started to play with Chat GPT, Google Bard, or Microsoft Bing. In your company folks are already experimenting with different ways of data to use it in their work.

These chat interfaces, as an initial proof of concept, are truly amazing. it’s already becoming clear, the ability to create significant business value and it will be dependent on your ability to INTEGRATE and MANAGE these systems and data.

But there are multiple barriers standing in the way of our ability to implement AI.

  • Fragmented data is hard to ingest into AI models.
  • Missing context leads to poor recommendations.
  • Lack of trust in how the LLMs will use your data.
  • Difficulty in acting on the recommendations because AI is completely detached from business processes.
  • And of course, overall security risks of accessing data across various systems.

Technology is moving fast, and the recent introduction of AI innovation is exciting, especially with the promise of increased productivity. If you look at a public source like Hugging Face, there are over 250k AI models compared to only 32 significant industry-produced machine learning models in 2022. If you pair these figures with the fact that the average enterprise has over 1000 applications, suddenly you have a lot of API integrations to account for.

Without addressing your system integration challenges, you risk deploying AI that results in generic data in, and generic insights out.

Generative AI and API ecosystem

Let’s find how API fits into this Large-language models (LLMs) or generative AI space.

You can start with an LLM of your choice, such as Salesforce CodeGen or OpenAI’s CoPilot.

A large language model (LLM) is a deep learning algorithm that can perform a variety of natural language processing (NLP) tasks.

As you know, big models incur big cost, and LLM’s are expensive.

So large language models are exposed as APIs to reduce cost. As we know, APIs are the easiest way to get data in and data out from these LLM. These LLM’s are open for anyone to use. These APIs are also pulling data from your existing system as well as legacy system. Now you are enabling APIs which is required for your business process and adding data context which is make sense to business use-case.

Next, you can establish control over the APIs for your LLM by applying governance and security policies using Universal API Management. In this way, you can assure that your organization is leveraging AI while remaining secure and conformant. Once your APIs are secured then you can add automation and integration flow with your APIs which communicate with your internal systems. Enabling AI data through API You can push and pull data from a variety of data sources, including 3rd party applications, to ensure that you are using the latest data with the latest technology and building a complete 360 view of your customer.

API Safely unlock generative AI capabilities through a layer of trust Use Universal API management (UPIM) to provide security and governance for AI driven systems. The integration and automation tools also ensure the customer 360 is all up to date with the latest data, making powerful customer experiences possible.

MuleSoft 4: Using Java in Mule Flow

MuleSoft is a lightweight integration and API platform that allows you to connect anything anywhere and enable your data through API. Mule evolved from java and spring framework. MuleSoft supports multiple language although all Mule module are developed in java.

 Since Mule evolved from java it has capability to use direct java class and method in Mule flow. This capability gives flexibility to Mule developer to use java for complex business logic.

There are several ways you can use java within Mule. Here are some of Java modules available to use within MuleSoft application

There are 4 java modules are available in MuleSoft flow

  1. New
  2. Invoke
  3. Invoke static
  4. Validate type

To explain all these components and uses in Mule flow I created Utils.java and AppUtils.java classes

1. New – AppUtils.java class instantiation can be achieved by calling constructor of this class through MuleSoft New component within Mule flow.

AppUtils java class defined 2 contractors, So Mule constructor properties for NEW component is showing 2 options.

New module without parameter

<java:new doc:name="Instantiate appUtils" doc:id="22ddcb7e-82ed-40f8-bc11-b779ceedd1a1"
constructor="AppUtils()" class="com.vanrish.AppUtils" target="appInst">
</java:new>

New module with parameter

<java:new doc:name="Instantiate appUtils" doc:id="22ddcb7e-82ed-40f8-bc11-b779ceedd1a1"
constructor="AppUtils(String)" class="com.vanrish.AppUtils" target="appInst">
<java:args ><![CDATA[#[{paramVal:"Hello world}]]]>
</java:new>

In above code, Instance of AppUtils class is created and placed into the “appInst”  target variables to reuse same instance in Mule flow.

New module
2. InvokeIn new java module we instantiate AppUtils.java class and placed into “appInst” variable. Now to use this variable set Invoke module and call one of method define in AppUtils.java class. In AppUtils.java class, there is one non static method “generateRandomNumber” defined with String parameter. In example we call this method through Invoke module.
<java:invoke doc:name="Invoke" doc:id="9348e2cf-87fe-4ff7-958c-f430d0421702"
instance="#[vars.appInst]" class="com.vanrish.AppUtils" method="generateRandomNumber(String)">
<java:args ><![CDATA[
#[{numVal:”100”}]]]></java:args>
</java:invoke>
Invoke module
3. Invoke staticInvoke static java module enable mule flow to call java static method. This is one of the easy ways to call any java method in Mule flow.

Mule code is calling to java static method

<java:invoke-static doc:name="Invoke static" doc:id="bc3e110c-d970-47ef-891e-93fb3ffb61bd" 
class="com.vanrish.AppUtils" method="encode(String)">
<java:args ><![CDATA[#[{plainString:"mystringval"}]]]></java:args>
</java:invoke-static>
Invoke-static module
4. Validate typeValidate type java module use instance of method from java. This module accepts “Accept subtypes” parameter which indicates if the operation should accept all subclasses of a class. By default it acceptSubtypes=“true” which means it will accept all sub class of main class but if it will set as false acceptSubtypes=“false” then during execution the operation throws an error (JAVA:WRONG_INSTANCE_CLASS)
<java:validate-type doc:name="Validate type" doc:id="288c791c-50eb-4be0-b924-56481dfdc023"
class="com.vanrish.Utils" instance="#[vars.appInst]" acceptSubtypes="false"/>
Validate-type module

Java in Mule flow diagram

java in Mule flow

Utils.java

package com.vanrish;

public class Utils{
	
}

AppUtils.java

package com.vanrish;
import java.util.Random;
import sun.misc.BASE64Encoder;
/**
 * @author rajnish
 */
public class AppUtils extends Utils {
	public static final BASE64Encoder encoder = new BASE64Encoder();
	//Constructor without Parameter
	public AppUtils(){
		System.out.println("Constructor with no parameter");
	}
	//Constructor with Parameter
  public AppUtils(String paramVal){
		System.out.println("Constructor with parameter value="+paramVal);
	}
	/**
	 * @param String
	 * @return
	 */
	public  String generateRandomNumber(String numVal) {
		Integer numNoRange = null;
		  Random rand = new Random();
		  if(numVal !=null) {
			  numNoRange = rand.nextInt(new Integer(numVal));
		  }else {
		   numNoRange = rand.nextInt();
		  }
	    return numNoRange.toString();
	}
	/**
	 * @param plainString
	 * @return
	 */
	public static String encode(String plainString)
	{
		String encodedString = encoder.encodeBuffer(plainString.getBytes());
		return encodedString;
	}
}

Mulesoft Code

<?xml version="1.0" encoding="UTF-8"?>
<mule xmlns:java="http://www.mulesoft.org/schema/mule/java" xmlns:db="http://www.mulesoft.org/schema/mule/db"
xmlns:ee="http://www.mulesoft.org/schema/mule/ee/core" xmlns:http="http://www.mulesoft.org/schema/mule/http" xmlns="http://www.mulesoft.org/schema/mule/core"
xmlns:doc="http://www.mulesoft.org/schema/mule/documentation"
xmlns:xsi="http://www.w3.org/2001/XMLSchema-instance" xsi:schemaLocation="http://www.mulesoft.org/schema/mule/core http://www.mulesoft.org/schema/mule/core/current/mule.xsd
http://www.mulesoft.org/schema/mule/http http://www.mulesoft.org/schema/mule/http/current/mule-http.xsd
http://www.mulesoft.org/schema/mule/ee/core http://www.mulesoft.org/schema/mule/ee/core/current/mule-ee.xsd
http://www.mulesoft.org/schema/mule/hl7 http://www.mulesoft.org/schema/mule/hl7/current/mule-hl7.xsd
http://www.mulesoft.org/schema/mule/db
http://www.mulesoft.org/schema/mule/db/current/mule-db.xsd
http://www.mulesoft.org/schema/mule/java http://www.mulesoft.org/schema/mule/java/current/mule-java.xsd"> <http:listener-config name="HTTP_Listener_config" doc:name="HTTP Listener config" doc:id="af3ce281-bf68-4c7b-83fb-52b2d2506677" > <http:listener-connection host="0.0.0.0" port="8081" /> </http:listener-config> <flow name="helloworldFlow" doc:id="a13826dc-67a1-4cda-8133-bc16a59ddba2" > <http:listener doc:name="Listener" doc:id="82522c77-5c33-4003-820a-7a04b51c3001" config-ref="HTTP_Listener_config" path="helloworld"/> <logger level="INFO" doc:name="Logger" doc:id="b40bc107-1ab5-4a3f-8f20-d7dfb63e5acb" message="entering flow"/> <java:new doc:name="Instantiate appUtils" doc:id="c1854580-f4d4-4e5c-a34d-7ca185152d02" constructor="AppUtils(String)" class="com.vanrish.AppUtils" target="appInst" > <java:args ><! [CDATA[#[{ paramVal:"Hello world" }]]]></java:args> </java:new> <java:invoke doc:name="Invoke" doc:id="9348e2cf-87fe-4ff7-958c-f430d0421702" instance="#[vars.appInst]" class="com.vanrish.AppUtils" method="generateRandomNumber(String)"> <java:args ><![CDATA[#[{ numVal:null }]]]></java:args> </java:invoke> <java:invoke-static doc:name="Invoke static" doc:id="bc3e110c-d970-47ef-891e-93fb3ffb61bd" class="com.vanrish.AppUtils" method="encode(String)"> <java:args ><![CDATA[#[{ plainString:"mystringval" }]]]></java:args> </java:invoke-static> <java:validate-type doc:name="Validate type" doc:id="288c791c-50eb-4be0-b924-56481dfdc023" class="com.vanrish.Utils" instance="#[vars.appInst]"/> <set-payload value="Success" doc:name="Set Payload" doc:id="8b6c9c0b-07c8-4e17-b649-2c24d4da8bea" /> </flow> </mule>

Mule 4: Consuming APIs through Mule 4 application

Mulesoft is all about API strategy and digital transformation of your organization through APIs within cloudHub or in premise.  Mulesoft also provides platform for APIs to monitor and analyze the usage, control access and protect sensitive data with security policies. API is at the heart of digital transformation and it enables greater speed, flexibility and agility of any organization.

            Exposing of your APIs is one aspect of your digital transformation strategy, but consuming API is also as important as exposing APIs. Consuming API is either application getting data from APIs or create/update data through APIs. Most of APIs are based on HTTP/HTTPS protocol. In Mule 4 consuming APIs is also start with configuration of HTTP/HTTPs protocol.

Configuration of HTTP/HTTPS— HTTP/HTTPS configuration start with selecting protocol. If API is available through HTTP then select protocol HTTP with default port 80 or change port based on expose API document.  If APIs are available through secured connection, then select HTTPS protocol with default port 443. Fill the Host with your expose API end point without any protocol. Fill the other field with default value.

Authentication of API are available with five different selection

  1. None – No authentication. Available for everyone
  2. Expression – Custom or expression-based authentication
  3. Basic authentication – Username/Password authentication
  4. Digest authentication — web server can use to negotiate credentials, such as username or password, with a user’s web browser
  5. Ntlm authentication — NT (New Technology) LAN Manager (NTLM) . Microsoft security protocols intended to provide authentication, integrity, and confidentiality to users


If you are working on post/patch/put method api to send data into expose api, set some important parameter based on streaming mode. If API are exposed as streaming mode, then you need to mention content-size of streaming otherwise set value as “NEVER”, then you no need to set content-size.

API Get Call – API get call implement GET method of APIs. Implementation of API get call need parameters. Based on these parameters application get set of data. MuleSoft provide 4 ways to pass these parameters or values.

  • Body
  • Headers
  • Query Parameters
  • URI Parameters

Flow for GET Method

API POST/PUT/PATCH Call –

POST – Create data

PUT/PATCH – Update data

Similar to Get method call, for POST/PUT/PATCH method application send API parameters based on API requirement. Since application is creating/Updating data through POST/PUT/PATCH api call, application sends these data through body parameters with content-type.

Flow for POST/PUT/PATCH Method

Here is flow of API GET call

Implemented code

<?xml version="1.0" encoding="UTF-8"?>
<mule xmlns:db="http://www.mulesoft.org/schema/mule/db" xmlns:ee="http://www.mulesoft.org/schema/mule/ee/core"
xmlns:http="http://www.mulesoft.org/schema/mule/http"
xmlns="http://www.mulesoft.org/schema/mule/core" xmlns:doc="http://www.mulesoft.org/schema/mule/documentation" xmlns:xsi="http://www.w3.org/2001/XMLSchema-instance" xsi:schemaLocation="http://www.mulesoft.org/schema/mule/core http://www.mulesoft.org/schema/mule/core/current/mule.xsd
http://www.mulesoft.org/schema/mule/http http://www.mulesoft.org/schema/mule/http/current/mule-http.xsd
http://www.mulesoft.org/schema/mule/ee/core http://www.mulesoft.org/schema/mule/ee/core/current/mule-ee.xsd
http://www.mulesoft.org/schema/mule/db http://www.mulesoft.org/schema/mule/db/current/mule-db.xsd">
 <configuration-properties doc:name="Configuration properties" doc:id="4bfab9b8-5f36-4b72-b335-35f6f7c3627e" file="mule-app.properties" />
 
<http:listener-config name="HTTP_Listener_config" doc:name="HTTP Listener config" doc:id="49f690e3-8636-45a2-a3f3-244fa170f2f0" basePath="/media" >
<http:listener-connection host="0.0.0.0" port="8081" />
</http:listener-config>
<http:request-config name="HTTPS_Request_configuration" doc:name="HTTP Request configuration" doc:id="4e8927df-e355-4dcd-9bdc-bf154ab1146a" requestStreamingMode="NEVER">
<http:request-connection host="api.vanrish.com" port="443" protocol="HTTPS" connectionIdleTimeout="50000" streamResponse="true">
<http:authentication >
<http:basic-authentication username="2xxxxxxx-xxx0-xxbx-bxxf-xxxxxxxc5" password="xxxxxxxx3dxxxxxb153dbxxxxx29cxxx"/>
</http:authentication>
</http:request-connection>
</http:request-config>
<flow name="demo-mediaFlow" doc:id="a55b1d37-b63d-4336-8d8e-5b70bc354078">
<scheduler doc:name="Scheduler" doc:id="9dc041e5-3140-47a1-a13c-39ee3ba59389" >
<scheduling-strategy >
<fixed-frequency timeUnit="SECONDS"/>
</scheduling-strategy>
</scheduler>
<logger level="INFO" doc:name="Logger" doc:id="9bc54079-8718-4dc1-a433-91081dfdabff" message="Get flow Entering ..... "/>
<http:request method="GET" doc:name="Request" doc:id="872f3240-e954-469a-b330-83aa7e40c3db" config-ref="HTTPS_Request_configuration" path="/api/users">
         <http:headers ><![CDATA[#[output application/java
---
{
"client_id" : "xxxx2-d960-4xxx-b5df-4d704ce2xxxx",
"client_secret" : "xxxd5e8663xxxf1b153db732529cxxx",
"Range" : "items=0-2000"
}]]]></http:headers>
<http:uri-params ><![CDATA[#[output application/java
---
{
test : "123"
}]]]></http:uri-params>
     
</http:request>
<logger level="INFO" doc:name="Logger" doc:id="9b733315-038b-4f4c-9c2e-15fc026f0524" message="data coming from GET API ...... total payload size --- #[sizeOf(payload)]"/>
<ee:transform doc:name="Transform Message" doc:id="383e857d-efe7-45df-ab33-b75a073080b7" >
<ee:message >
<ee:set-payload ><![CDATA[%dw 2.0
output application/json
---
payload]]></ee:set-payload>
</ee:message>
</ee:transform>
<logger level="INFO" doc:name="Logger" doc:id="769a6306-ee9a-4f51-94ad-562ad1042c5e" message="Getting data from API #[payload]"/>
</flow>
</mule>

Mule 4: APIKit for SOAP Webservice

Mule 4 introduced APIKit for soap webservice. It is very similar to APIKit for Rest. In SOAP APIKit, it accepts WSDL file instead of RAML file. APIKit for SOAP generates work flow from remote WSDL file or downloaded WSDL file in your system.

To create SOAP APIKit project, First create Mulesoft project with these steps in Anypoint studio.

Under File Menu -> select New -> Mule Project

Mule 4 Project Settings

In above pic WSDL file gets selected from local folder to create Mule Project.

Once you click finish, it generates default APIKit flow based on WSDL file.

In this Mulesoft SOAP APIKit example project, application is consuming SOAP webservice and exposing WSDL and enabling SOAP webservice.

Mule 4 API Kit for Soap Router

In SOAP Router APIKit, APIKit SOAP Configuration is defined WSDL location, Services and Port from WSDL file.

API Kit SOAP configuration

In above configuration, “soapkit-config” SOAP Router look up for requested method. Based on requested method it reroutes request from api-main flow to method flow. In this example, requested method is “ExecuteTransaction” from existing wsdl, so method flow name is

<flow name=“ExecuteTransaction:\soapkit-config”>  

In this example we are consuming same WSDL but end point is different.

To call same WSDL we have to format our request based on WSDL file. In dataweave, create request based on WSDL and sending request through HTTP connector.

Here is dataweave transformation to generate request for existing WSDL file

%dw 2.0
output application/xml
ns soap http://schemas.xmlsoap.org/soap/envelope/
ns xsi http://www.w3.org/2001/XMLSchema-instance
ns ns0 http://localhost/Intellect/ExternalWebService
ns xsd http://www.w3.org/2001/XMLSchema
ns ns1 xsd:string
---
 
{
  	soap#Envelope @('xmlns:xsi': 'http://www.w3.org/2001/XMLSchema-instance'): {
  	 	
  	soap#Body: {
     	ExecuteTransaction @('xmlns': 'http://localhost/Intellect/ExternalWebService'): {
     	  Request @(xsi#'type': 'xsd:string'): payload.soap#Body.ns0#ExecuteTransaction.Request 
     	 
     	  }
     	
    	}
    	
  	}
}

Here is main flow

Main flow for API SOAP Kit

Here is full code

<?xml version="1.0" encoding="UTF-8" standalone="no"?>
<mule xmlns="http://www.mulesoft.org/schema/mule/core"
xmlns:apikit-soap="http://www.mulesoft.org/schema/mule/apikit-soap"
xmlns:doc="http://www.mulesoft.org/schema/mule/documentation"
xmlns:ee="http://www.mulesoft.org/schema/mule/ee/core"
xmlns:http="http://www.mulesoft.org/schema/mule/http"
xmlns:wsc="http://www.mulesoft.org/schema/mule/wsc"
xmlns:xsi="http://www.w3.org/2001/XMLSchema-instance"
xsi:schemaLocation="http://www.mulesoft.org/schema/mule/core
http://www.mulesoft.org/schema/mule/core/current/mule.xsd
http://www.mulesoft.org/schema/mule/http
http://www.mulesoft.org/schema/mule/http/current/mule-http.xsd
http://www.mulesoft.org/schema/mule/apikit-soap
http://www.mulesoft.org/schema/mule/apikit-soap/current/mule-apikit-soap.xsd
http://www.mulesoft.org/schema/mule/wsc
http://www.mulesoft.org/schema/mule/wsc/current/mule-wsc.xsd
http://www.mulesoft.org/schema/mule/ee/core
http://www.mulesoft.org/schema/mule/ee/core/current/mule-ee.xsd"
> <http:listener-config basePath="/fda" name="api-httpListenerConfig"> <http:listener-connection host="0.0.0.0" port="8081"/> </http:listener-config> <apikit-soap:config httpStatusVarName="httpStatus" name="soapkit-config" port="ISTCS2SubmitOrderSoap" service="ISTCS2SubmitOrder" wsdlLocation="ISTCOrder.wsdl"/> <wsc:config doc:id="b2979182-c4e9-489b-9420-b9320cfe9311" doc:name="Web Service Consumer Config" name="Web_Service_Consumer_Config"> <wsc:connection address="https://enterprisetest.vanrish.com/pub/xchange/request/atlas" port="ISTCS2SubmitOrderSoap" service="ISTCS2SubmitOrder" wsdlLocation="api/ISTCOrder.wsdl"/> </wsc:config> <http:request-config doc:id="408de2f8-c21a-42af-bfe7-2d7e25d153b0" doc:name="HTTP Request configuration" name="HTTP_Request_configuration"> <http:request-connection host="enterprisetest.fadv.com" port="443" protocol="HTTPS"/> </http:request-config> <flow name="api-main"> <http:listener config-ref="api-httpListenerConfig" path="/ISTCS2SubmitOrder/ISTCS2SubmitOrderSoap"> <http:response statusCode="#[attributes.protocolHeaders.httpStatus default 200]"/> <http:error-response statusCode="#[attributes.protocolHeaders.httpStatus default 500]"> <http:body><![CDATA[#[payload]]]></http:body> </http:error-response> </http:listener> <apikit-soap:router config-ref="soapkit-config"> <apikit-soap:attributes><![CDATA[#[%dw 2.0 output application/java --- { headers: attributes.headers, method: attributes.method, queryString: attributes.queryString }]]]></apikit-soap:attributes> </apikit-soap:router> </flow> <flow name="ExecuteTransaction:\soapkit-config"> <logger doc:id="62a3748e-b81c-4a95-9af0-99c5a282b237" doc:name="Logger" level="INFO" message="Entering into flow"/> <ee:transform doc:id="c130d7ff-bd70-4af0-b7d4-9a6caa0d771f"> <ee:message> <ee:set-payload><![CDATA[%dw 2.0 output application/xml ns soap http://schemas.xmlsoap.org/soap/envelope/ ns xsi http://www.w3.org/2001/XMLSchema-instance ns ns0 http://localhost/Intellect/ExternalWebService ns xsd http://www.w3.org/2001/XMLSchema ns ns1 xsd:string --- { soap#Envelope @('xmlns:xsi': 'http://www.w3.org/2001/XMLSchema-instance'): { soap#Body: { ExecuteTransaction @('xmlns': 'http://localhost/Intellect/ExternalWebService'): { Request @(xsi#'type': 'xsd:string'): payload.soap#Body.ns0#ExecuteTransaction.Request } } } } ]]></ee:set-payload> </ee:message> </ee:transform> <http:request config-ref="HTTP_Request_configuration" doc:id="6d7001f3-b90a-4ed8-96d2-d577329d21d5" doc:name="Request" method="POST" path="/pub/xchange/request/atlas"/> <logger doc:id="a05e704f-e539-48f3-9556-fe66641e3f64" doc:name="Logger" level="INFO" message="#[payload]"/> </flow> </mule>


Anypoint studio 7.0+: Simplified your business integration development

In my previous blog I explained new Mule 4 feature and enhancement of Mule runtime. To support these feature Mulesoft released  new editor with new look and feel. If you are coming from Mule 3 and its Anypoint studio, you will not find much difference but there is lot of makeover of editor and some cool feature in Anypoint studio 7.0. With new Anypoint studio, it accelerates developer productivity with a single graphical environment for integration with SaaS and on-premises systems, API implementation, and testing. It Deploys  your applications on-premises or in the cloud with Mule runtime engine. Anypoint Studio is MuleSoft’s Eclipse-based integration development environment for designing and testing Mule applications.

Now let’s move on new Anypoint studio features and configuration.

1. Installation & Configuration – Download and installation of Anypoint studio is available based on operating system. Download your Anypoint studio based on your operating system. Make sure JDK 1.8 in install and configure in your system before installation of Anypoint studio. This version of Studio is not compatible with Java 9 or Java 10. MuleSoft recommends a minimum of 4GB of free RAM, 2GHz CPU and 10GB free hard drive space available on a developer workstation. To install Anypoint studio you need to extract your  download zip file and set your workspace area in your system. If you are still getting java error during your Anypoint start. Please open AnypointStudio.ini  file and add this line in this file

-vm  C:\software\java\bin

2. Maven – This version of Anypoint studio comes with Maven installation default. You no need to install maven separately like previous version.  Studio comes with Maven 3.3.9 bundled, but you can externally use the versions: 3.3.3 or your own 3.3.9.

3. Mule palette — If you are coming from previous version of Anypoint studio you will find extreme make over  for Mule palette in newer version of Anypoint studio.  It has added couple of section and related action in this Mule palette to speed up the development process. It created two level of palette to improve access times, discoverability and categorization. You can search connector and add modules from Mule palette. You can also search your project/modules in exchange from Mule palette. There is Favorites  section  you can add most used connector and action. Here is couple of sections of Mule palette
Mule Palette
  • Category List
  • Manage you modules
  • Operation inside the category
  • Search Modules from Exchange
  • Add Modules to your current project
  • Favorites
  • Add to favorites

4. Editor/Canvas—Studio editors help you design and edit the definitions of your applications, APIs, properties, and configuration files. In canvas you can see all visual representation of your flows. These flows are collapsible Flows. In new Anypoint editor you can now preview the content of the collapsed flow by simply hovering over the region for a second. New version editor it added new set of graphic icons for better usability. In new Anypoint studio new feature added to navigate from visual view to XML view by simple right clicking on any component and select “Go to XML”

Anypoint Studio Canvas

5. Managing Anypoint platform credential—Through Anypoint studio you can manage and configure Anypoint Platform credentials. To enable this feature you have to browse in Anypoint studio top  navigation

Window->preference->Anypoint Studio->Authentication->Add


Now here you can add multiple user Anypoint platform credential.
Once you add here now when creating a new Mule project (File > New > Mule Project), if you select an API implementation from Design Center, the toolbar displays at the top of the selection dialog.

Project API location from Design Center
Design Center Access

Similarly, if you select Search in Exchange from the Mule Palette, the toolbar displays in a slightly different form.

Add Modules to Project

6. Dataweave everywhere— As Mule 4 supporting Dataweave is default language. Now you can see new  Anypoint editor enable Dataweave for all component. You can now toggle between “literal” and “Expression” modes using the new expression button. When clicking the “Expression” mode, you can use auto-suggestions for Dataweave 2.0.

Dataweave everywhere in Anypoint editor

Additionally, using the expression mode, you can click the New Map button next to Fields to use the visual mapper to build expressions for individual fields.

Dataweave in log message

Conclusion—New Anypoint  studio accelerates  developer productivity with a single graphical environment for integration with SaaS and on-premises systems, API implementation, and testing. Studio enables  you to deploy your applications on-premises or in the cloud with Mule runtime engine.

Mule 4: Ease Your Integration Challenges

Much awaited Mulesoft 4 was officially announced in Mulesoft Connect 2018 in San Jose. When Mulesoft was born, it was really to create software that helps to interact systems or source of information quickly within or outside company. So the speed is an incredibly important thing over the years to develop and interact within systems. Need of speed for application and development hasn’t change drastically over the years but needs and requirement of customer’s application have changed. The integration landscape has also magnified. There are hundreds of new systems and sources of information to connect to, with more and more integration requirements. This integration landscape gets very messy and very quickly.

            Mule 4 provides a simplified language, simplified runtime engine and ultimately reduces management complexity.  It helps customers, developers to deliver application faster. Mule4 is really radically simplified development. It is providing new tool to simplify your development, deployment and management of your integration/API. It is also providing a platform to reuse Mule component without affecting existing application for faster development. Mule 4 is evolution of Mule3. You will not seem lost in Mule 4, if you are coming from Mule3. But Mule 4 implements fewer concepts and steps to simplify whole development/integration process. Mule 4 has now java skill is optional. In this release Mulesoft is improving tool and making error reporting more robust and platform independent.

Now let’s go one by one with all these new Mule4 features.

1. Simplified Event Processing and Messaging — Mule event is immutable, so every change to an instance of a Mule event results in the creation of a new instance. It contains the core information processed by the runtime. It travels through components inside your Mule app following the configured application logic. A Mule event is generated when a trigger (such as an HTTP request or a change to a database or file) reaches the Event source of a flow. This trigger could be an external event triggered by a resource that might be external to the Mule app.

Mule 4 Event flow

2. New Event and Message structure — Mule 4 includes a simplified Mule message model in which each Mule event has a message and variables associated with it. A Mule message is composed of a payload and its attributes (metadata, such as file size). Variables hold arbitrary user information such as operation results, auxiliary values, and so on.

Mule 4 message

Mules 4 do not have Inbound, Outbound and Attachment properties like  Mule 3. In mule 4 all information are saved in variables and attributes. Attributes in Mule 4 replace inbound properties. Attributes can be easily accessed through expressions.

 These are advantages to use Attributes in Mule 4.

  • They are strongly typed, so you can easily see what data is available.
  • They can easily be stored in variables that you can access throughout your flow
Example :
#[attributes.uriParams.jobnumber]

Outbound properties — Mule 4 has no concept for outbound properties like in Mule 3. So you can set status code response or header information in Mule 4 through Dataweave expression without introducing any side effects in the main flow.

Example:

 
<ee:transform xsi:schemaLocation="http://www.mulesoft.org/schema/mule/ee/core
 http://www.mulesoft.org/schema/mule/ee/core/current/mule-ee.xsd">
       <ee:message>
         <ee:set-payload>
           <![CDATA[
                %dw 2.0
                output application/json
                 ---
                 {message: "Bad request"}]]>
           </ee:set-payload>
         </ee:message>
    <ee:variables>
       <ee:set-variable variableName="httpStatus">400</ee:set-variable>
    </ee:variables>
  </ee:transform>

Session Properties –In Mule 4 Session properties are no longer exist. Data store in variables are passes along with  different flow.

3. Seamless data access & streaming – Mule 4 has fewer concepts and steps. Now every steps and task of  java language knowledge is optional. Mule 4 is not only leveraging DataWeave as a transformation language, but expression language as well. For example in Mule 3  XML/CSV data need to be converted into java object to parse or reroute them. Mule 4 gives the ability to parse or reroute through Dataweave expression without converting into java. These steps simplify your implementation without using java.

Mule 4 Data Access

4. Dataweave 2.0 — Mule 4 introduces DataWeave as the default expression language replacing Mule Expression Language (MEL) with a scripting and transformation engine. It is combined with the built-in streaming capabilities; this change simplifies many common tasks. Mule 4 simplifies data iteration. DataWeave knows how to iterate a json array. You don’t even need to specify it is json. No need to use <json:json-to-object-transformer /> to convert data into java object.

Mule 4 vs Mule 3 flow comparison

Here are few points about Dataweave 2.0

  • Simpler syntax to learn
  • Human readable descriptions of all data types
  • Applies complex routing/filter rules.
  • Easy access to payload data without the need for transformation.
  • Performs any kind of data transformation, normalization, grouping, joins, pivoting and filtering.

5. Repeatable Streaming – Mule 4 introduces repeatable streams as its default framework for handling streams. To understand the changes introduced in Mule 4, it is necessary to understand how Mule3 data streams are consumed

Mule 3 data streaming examples

In above three different Mule 3 flows, once stream data is consumed by one node it is empty stream for 2nd node. So in the above first example, in order to log the stream payload , the logger has to consume the entire stream of data from HTTP connector. This means that the full content will be loaded into memory. So if the content is too big and you’re loading into memory, there is a good chance the application might run out of memory.

So Mule 4 repeatable streams enable you to

  • Read a stream more than once
  • Have concurrent access to the stream.
  • Random Access
  • Streams of bytes or streams of objects

As a component consumes the stream, Mule saves its content into a temporary buffer. The runtime then feeds the component from the temporary buffer, ensuring that each component receives the full stream, regardless of how much of the stream was already consumed by any prior component

Here are few points, how repeatable streams works in Mule 4

  • Payload is read into memory as it is consumed
  • If payload stream buffer size is > 512K (default) then it will be persisted to disk.
  • Payload stream buffer size can be increased or decreased by configuration to optimize performance
  • Any stream can be read at any random position, by any random thread concurrently

6. Error Handling — In Mule 4 error handling has been changed significantly. Now In mule 4 you can discover errors at design time with visual interface. You no need to deal with java exception directly and it is easy to discover error while you are building flow. Every flow listed all possible exception which potential arises during execution.

Mule 4 Error Handling

Now errors that occur in Mule fall into two categories

  • Messaging errors
  • System errors

  Messaging errors — Mule throws a messaging error (a Mule error) whenever a problem occurs within a flow. To handle Mule errors, you can set up On Error components inside the scope-like Error Handler component. By default, any unhandled errors are logged and propagated.

System errors — Mule throws a system error when an exception occurs at the system level . If no Mule Event is involved, the errors are handled by a system error handler.

Try catch Scope — Mule 4 introduces a new try scope that you can use within a flow to do error handling of just inner components/connectors. This try scope also supports transactions and in this way it is replacing Old Mule 3 transaction scope.

Mule 4 A new try catch block

7. Class Loader Isolation — Class loader separates application completely from Mule runtime and connector runtime. So, library file changes (jar version) do not affect your application. This  also gives flexibility to your application to run any Spring version without worry about Mulesoft spring version. Connectors are distributed outside the runtime as well, making it possible to get connector enhancements and fixes without having to upgrade the runtime or vice versa

In above pic showing that every component in any application have their own class loader and running independently on own class loader.

8. Runtime Engine — Mule 4 engine is new reactive and non-blocking engine. In Mule 4 non-blocking flow always on, so no processing strategy in flow. One best feature of Mule 4 engine is, It is self-tuning runtime engine. So what does this mean? If Mule 4 engine is processing your applications on 3 different thread pools, So runtime knows  which application should be executed by each thread pool. So operation put in corresponding thread pool based on high intensive CPU processing or light intensive CPU processing or I/O operation. Then 3 pools are dynamic resizing automatically to execute application through self-tuning.


Mule 4 : Self tuning run time engine

So now self-tuning creates custom thread pools based on specific tasks. Mule 4 engine makes it possible to achieve optimal performance without having to do manual tuning steps.

Conclusion

Overall Mule 4 is trying to make application development easy, fast and robust. There are more features included in Mule 4 which I will try to cover in my next blog. I will also try to cover more in depth info in above topic of Mule 4. Please keep tuning for my next blog.

RAML:Schema Validation for APIs

Initially when REST was introduced there was always challenge to validate your request against prerequisite requirement. This was available in SOAP web services as XSD schema validation but it was not available in REST webservice. Architect and developer had to face the challeng to implement some kind of schema to validate their request.

YAML based RAML (Restful API modeling Language) was introduced in 2013. RAML gives flexibility to define schema to validation request/response. This breakthrough helps Architect and developer to define schema for REST API to validate request/response.

RAML schema validation can be defined in two formats.
1) XSD Based
2) Json Based.

Schema validation can be defined in two ways inside RAML
1) Inline schema definition
2) XSD or json schema definition file.

Schema definition can be defined in schema tag within RAML file.
“!Include” tag uses to include schema file for file based schema definition within RAML.
Json based schema definition

/car:
  post:
    description: Getting car info from Car Application
    body:
      application/json:
        schema: !include schemas/cars-schema-request.json 

XSD based schema definition

responses: 
      200:
        body:
          application/xml: 
              schema: !include schemas/vanrish-car-response.xsd

Inline definition of schema

/car:
  post:
    description: Getting car info from Car Application
    body:
      application/json:
        schema: |
	     {
             "type": "object",
             "$schema": "http://json-schema.org/draft-03/schema",
             "required": true,
             "properties": {              
              "vin": {
                  "type": "string",
                  "required": true
              },
              "model": {
                  "type": "string",
                  "required": true
              },
              "make": {
                  "type": "string",
                  "required": true              
              }
            }
          } 

Here are few tips to use json based schema validation.

1) If request/response is object based then in schema it is defined as type:Object .

"$schema": "http://json-schema.org/draft-03/schema",
"type": "object"

2) If request/response is list based then it is defined as

"$schema": "http://json-schema.org/draft-03/schema",
"type": "array",
"items": {

3) If request/response is list and it contain object, it is defined as

"items": {
  "type": "object",
  "properties": {
    "vin": {
      "type": "string"
}

4) Type of field for Object can be defined as string,integer, or boolean

"vin": {
  "type": "integer"
}

5) Field can be restricted for known value with defining enum

"isCdl": {
  "description": "State",
  "type": "string",
  "enum": [ "true", "false" ]
}

6) Field can be made mandatory by introducing required field

"name": {
  "type": "string",
  "required": true
}

7) Any field can be validated against regular expression by defining regex code

"deviceName": {
  "type": "string",
  "pattern": "^/dev/[^/]+(/[^/]+)*$"
}

8) Maximum and minimum field length can be validated with defining maxLength and minLength field

"id": {
  "description": "A three-letter id",
  "type": "string",
  "maxLength": 3,
  "minLength": 3
}

9) Reuse of validation by importing validated schema from different file system by defining like that

"credentials": { "$ref": "app-credential.json#/definitions/credential" }

10) anyOf, allOf, oneOf, not- these four keywords intend to bring logical processing primitives to Schema validation

{
  "anyOf": [
   { "type": [ "string", "boolean" ] },
   { "schema1": "#/definitions/nfs" },
   { "schema2": "#/definitions/pfs" }
 ]
}