Anypoint Platform acts as a client provider by default, but you can also configure external client providers to authorize client applications. As an API owner, you can apply an OAuth 2.0 policy to authorize client applications that try to access your API. You need an OAuth 2.0 provider to use an OAuth 2.0 policy. You can configure more than one client provider and associate the client providers with different environments. If you configure multiple client providers after you have already created environments, you can associate the new client providers with the environment.
MuleSoft supports client management by identity providers that implement the OpenID Connect Dynamic Client Registration open standard. MuleSoft explicitly verifies support in Anypoint Platform for Salesforce, Okta, and OpenAM v14 Dynamic Client Registration. The following table contains examples of the URLs you need to supply, depending on your provider, during registration.
URL Name
Okta Example URL
OpenAM Example URL
Salesforce Example URL
Base
https://example.okta.com/oauth2/v1
https://example.com/openam/oauth2
https://example.salesforce.com/services/oauth2
Client Registration
{BASE URL}/clients
{BASE URL}/connect/register
{BASE URL}/register
Authorize
{BASE URL}/authorize
{BASE URL}/authorize
{BASE URL}/authorize
Token
{BASE URL}/token
{BASE URL}/access_token
{BASE URL}/token
Token Introspection
{BASE URL}/introspect
{BASE URL}/introspect
{BASE URL}/introspect
URL Name
Okta Example URL
OpenAM Example URL
Salesforce Example URL
Steps to Create External Client Provider
Log in to Anypoint Platform using an account that has the organization administrator role.
In Anypoint Platform, click Access Management.
In the menu on the left, click Client Providers.
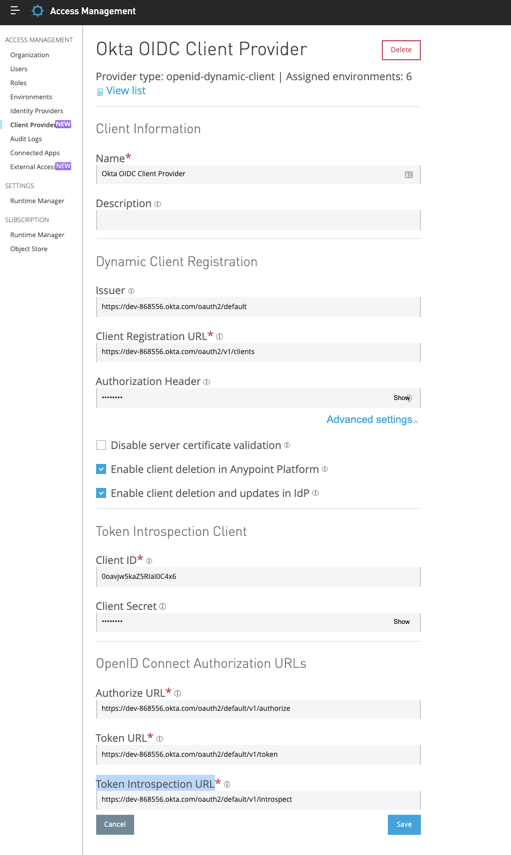
Click Add Client Provider, and then select OpenID Connect Dynamic Client Registration. The Add OIDC client provider page appears.
After obtaining values from your identity provider’s configuration, complete the following required fields in each section:
Dynamic Client Registration
Issuer: URL that the OpenID provider asserts is its trusted issuer.
Client Registration URL: The URL to dynamically register client applications as a client application for your identity provider.
Authorization Header
For Okta, this value is SSWS ${api_token}, where api_token is an API token created through Okta.
For ForgeRock, this value is Bearer ${api_token}, where api_token is an API token created through ForgeRock.
For Salesforce, this value is Bearer ${api_token}, where api_token is an API token created through Salesforce. In Advanced Settings you can also select:
Disable server certificate validation: Disables server certificate validation if your OpenID client management instance presents a self-signed certificate, or one signed by an internal certificate authority.
Enable client deletion in Anypoint Platform: Enables deletion of clients created with this integration.
Enable client deletion and updates in IdP: To use this option, you must also select the Enable client deletion in Anypoint Platform option.
Token Introspection Client
Client ID: The client ID for an existing client in your IdP capable of introspection of all tokens from all clients.
For Okta, this value should be a “Confidential” client.
For ForgeRock, this value should be a “Confidential” client.
For Salesforce, this value should be a “Confidential” client.
Client Secret: The client secret that corresponds to the client ID.
OpenID Connect Authorization URLs
Authorize URL: The URL where the user authenticates and grants OpenID Connect client applications access to the user’s identity.
Token URL: The URL that provides the user’s identity, encoded in a secure JSON Web Token.
Token Introspection URL: endpoint that returns metadata about the access token, including expiration and token active state.
Rajnish Kumar is CTO of Vanrish Technology with Over 25 years experience in different industries and technology. He is very passionate about innovation and latest technology like APIs, IOT (Internet Of Things), Artificial Intelligence (AI) ecosystem and Cybersecurity. He present his idea in different platforms and help customer to their digital transformation journey.
The Web Service Consumer is an existing connector in Mule 4 that you can configure to point to a SOAP based web service. Webservice consumer call webservice hosted elsewhere as WSDL SOAP services and get response. This connector simplified process and encapsulated all the feature to consume SOAP based webservice. When no connector is available specific to any product (like Service-Now, Workday etc.), which is hosted as SOAP based webservice then this webservice consumer Connector enables any services to consume.
The main feature of this connector is
Consuming
DOC Literal Web services.
SOAP
multipart messages.
SOAP
Headers.
DataSense
support for SOAP Headers, SOAP Body, and Attachment.
Embedded
DataWeave transformations inside the operation.
Support and
Unified experience for SOAP with attachments and MTOM handling.
Custom HTTP
configuration as transport (runtime and design time).
Web Service
Security (WS Security) support.
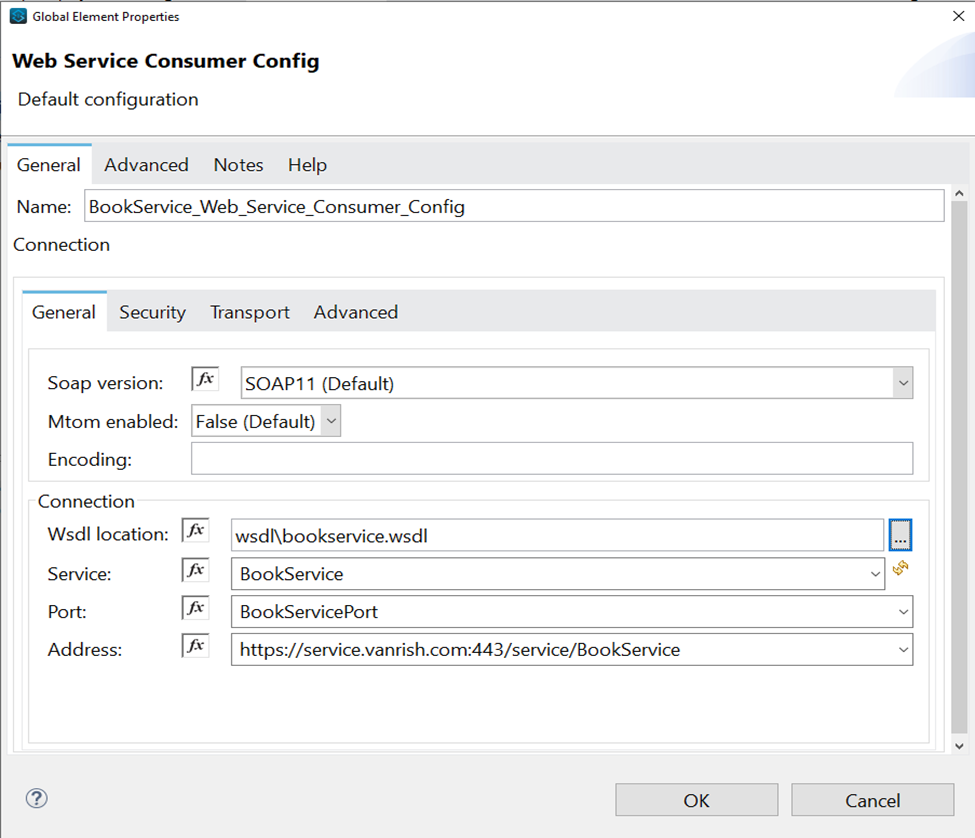
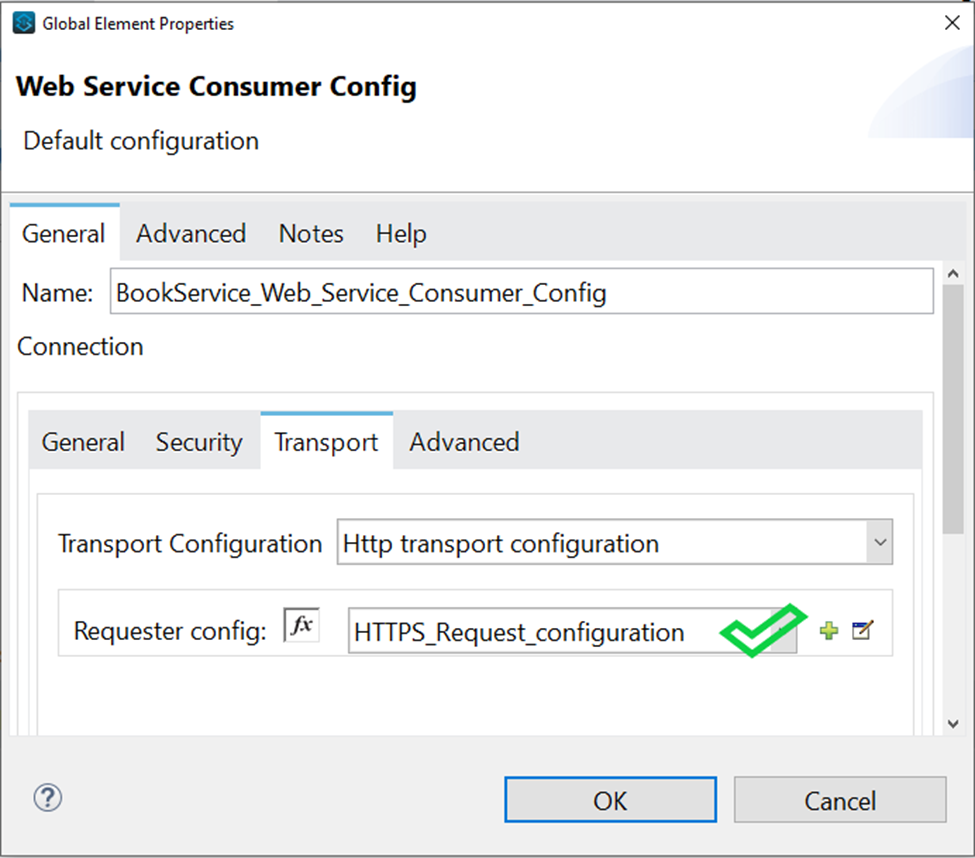
Connector Configuration- In this section we define connector configuration to communicate with SOAP based webservice end point. By default, connector uses a simple non protected HTTP configuration to send all outgoing SOAP message. In connector configuration you can select your SOAP version from drop down and provide WSDL location. Connector extract and populates Service, Port and webservice endpoint address from WSDL file.
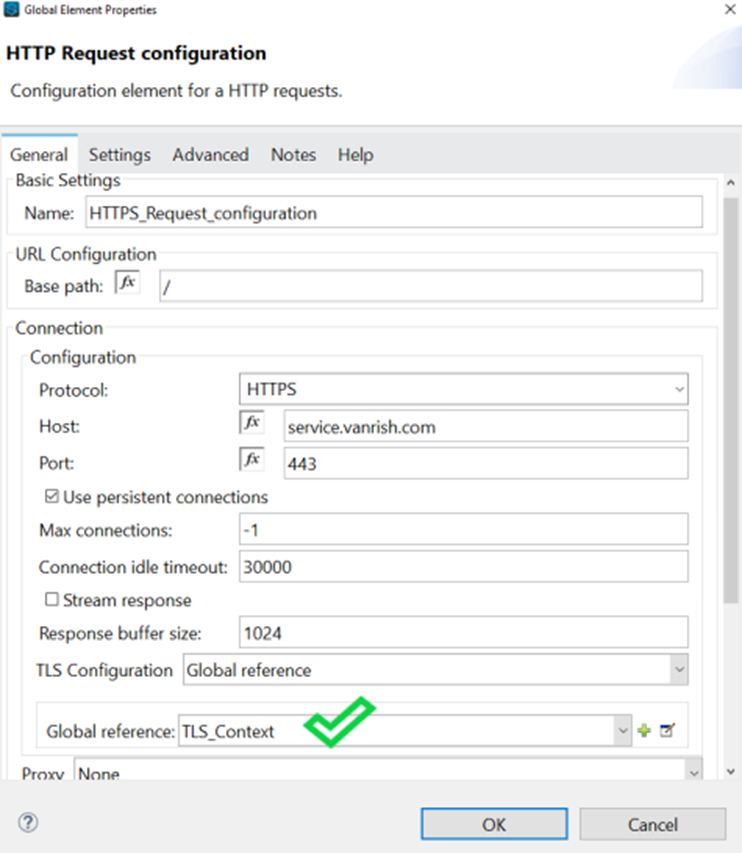
But if you are using secure endpoint address with HTTPS you need
to configure custom Transportation Configuration for HTTPS.
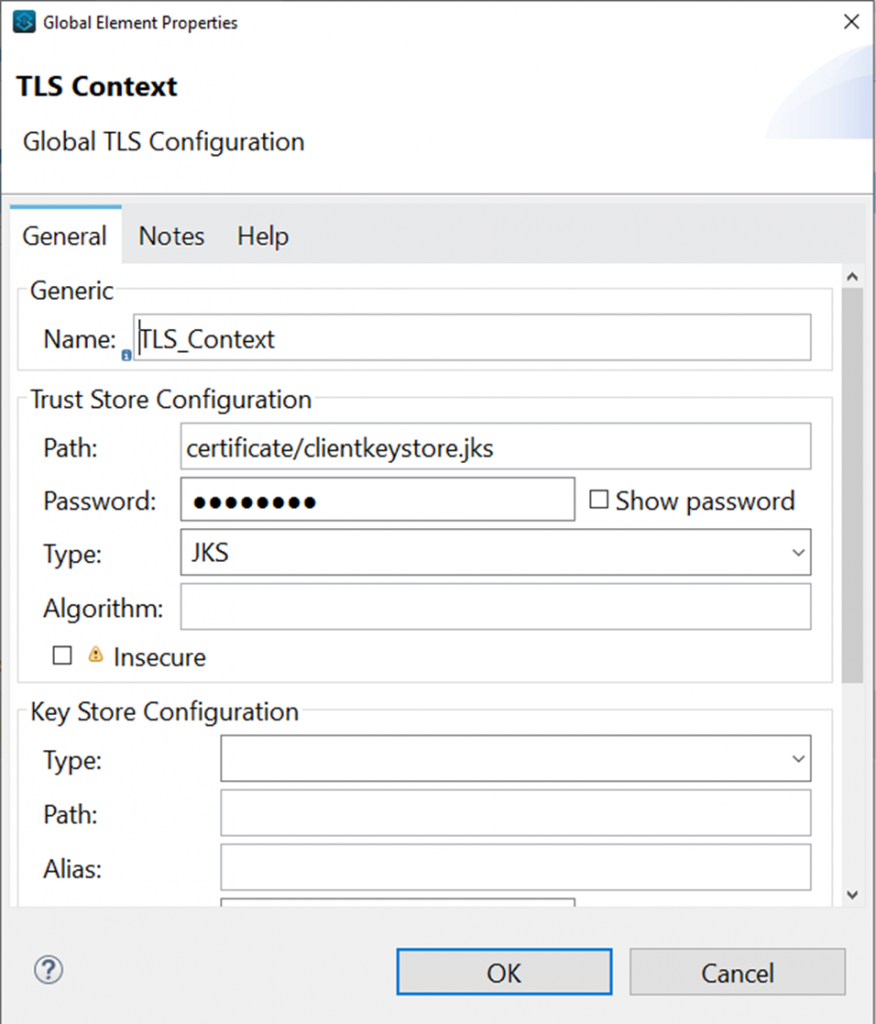
These are the steps to enable your secure HTTPS endpoint.
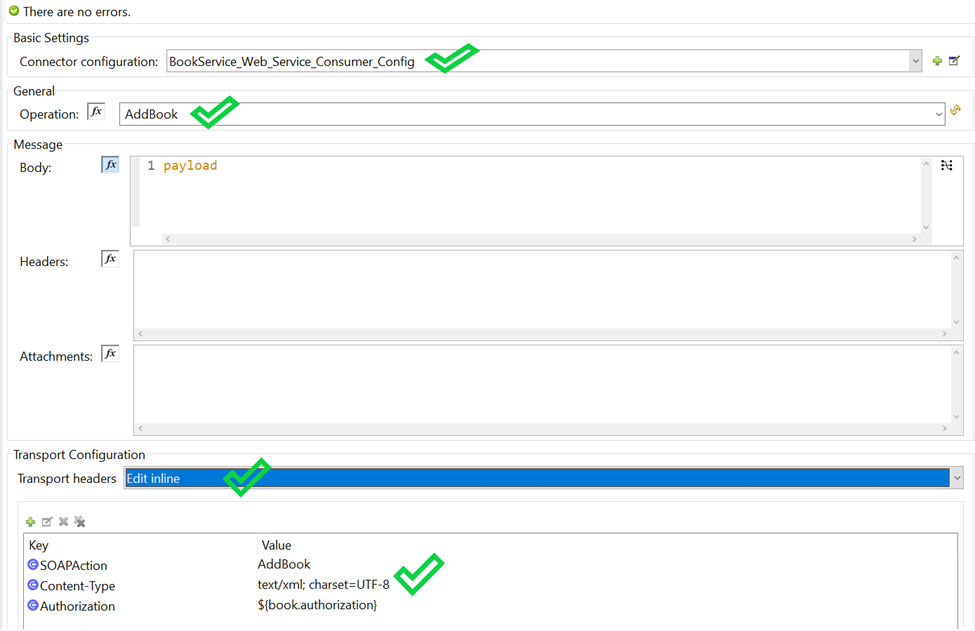
Connector Parameter- If connector configuration is configured properly, your operation parameters are available from WSDL as drop down options.
In
Message section there are three parameters available
Body – The Body is main part of the SOAP message. The body element accepts embedded DataWeave scripts as values so that you can construct the XML request without having a side effect on the message or having to use multiple components to create the request.
Headers – The headers element contains application-specific information (like authentication, payment, and so on) about the SOAP message . This elements accepts embedded DataWeave scripts as values.
Attachment – The attachments element enables you to bind attachments to the SOAP message. This element also accepts embedded DataWeave scripts as values.
Since you configured custom HTTPS connector for your webservice consumer Connector you can configure Transport Configuration. In Transport header section you can select “Edit inline” and add all your header parameters in line
Rajnish Kumar is CTO of Vanrish Technology with Over 25 years experience in different industries and technology. He is very passionate about innovation and latest technology like APIs, IOT (Internet Of Things), Artificial Intelligence (AI) ecosystem and Cybersecurity. He present his idea in different platforms and help customer to their digital transformation journey.
Mule 4 introduces DataWeave 2.0 as the default expression language replacing Mule Expression Language (MEL). DataWeave 2.0 is tightly integrated with the Mule 4 runtime engine, which runs the scripts and expressions in your Mule application.
Since Dataweave 2.0 is default expression language for Mule 4, Dataweave can use almost all place within your Mule application. So, In some use-case Dataweave needs to call java method or instantiate java class to execute java complex business logic.
In my previous blog I explained usage of java within Mulesoft flow. In this blog I am explaining usage of java within Dataweave 2.0.
There are 2 ways we can use java within Dataweave code
Calling java method
Instantiate Java class
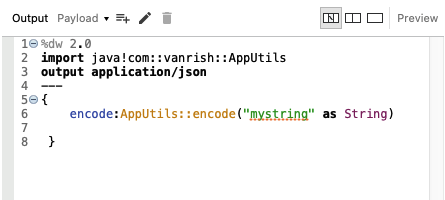
1. Calling java method — There is restriction with Dataweave when calling to java. you can only call Static methods via DataWeave (methods that belong to a Java class, not methods that belong to a specific instance of a class). Before making a method call from java class, you must import the class.
2. Instantiate Java class – Dataweave allows to instantiate a new object of any java class but you can’t call its instance method through dataweave. You can refer it as variables.
Rajnish Kumar is CTO of Vanrish Technology with Over 25 years experience in different industries and technology. He is very passionate about innovation and latest technology like APIs, IOT (Internet Of Things), Artificial Intelligence (AI) ecosystem and Cybersecurity. He present his idea in different platforms and help customer to their digital transformation journey.
MuleSoft is a lightweight integration and API platform that allows you to connect anything anywhere and enable your data through API. Mule evolved from java and spring framework. MuleSoft supports multiple language although all Mule module are developed in java.
Since Mule evolved from java it has capability to use direct java class and method in Mule flow. This capability gives flexibility to Mule developer to use java for complex business logic.
There are several ways you can use java within Mule. Here are some of Java modules available to use within MuleSoft application
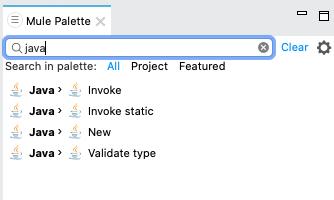
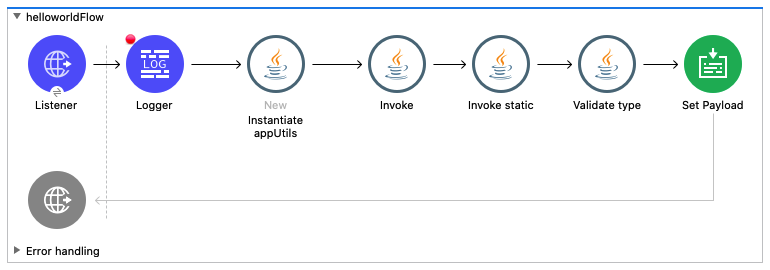
There are 4 java modules are available in MuleSoft flow
New
Invoke
Invoke static
Validate type
To explain all these components and uses in Mule flow I created Utils.java and AppUtils.java classes
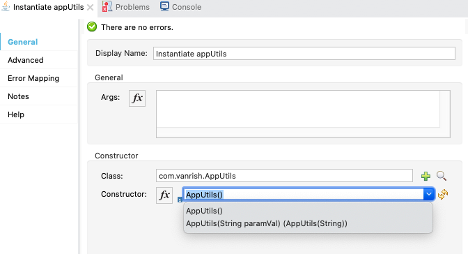
1. New – AppUtils.java
class instantiation can be achieved by calling constructor of this class
through MuleSoft New component within Mule flow.
AppUtils java class defined 2 contractors, So Mule constructor properties for NEW component is showing 2 options.
In above code, Instance of AppUtils class is created and placed into the “appInst” target variables to reuse same instance in Mule flow.
New module
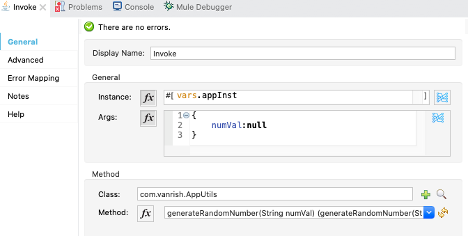
2. Invoke – In new java module we
instantiate AppUtils.java class and placed into “appInst” variable. Now to use
this variable set Invoke module and call one of method define in AppUtils.java
class. In AppUtils.java class, there is one non static method “generateRandomNumber”
defined with String parameter. In example we call this method through Invoke module.
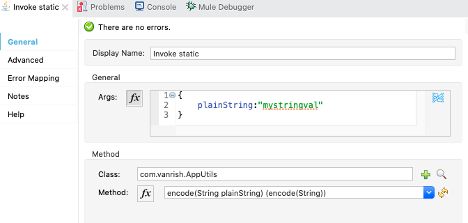
3. Invoke static—Invoke static java
module enable mule flow to call java static method. This is one of the easy ways
to call any java method in Mule flow.
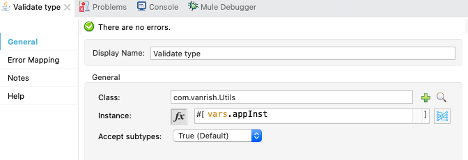
4. Validate type – Validate type java module
use instance of method from java. This module accepts “Accept subtypes”
parameter which indicates if the operation should accept all subclasses of a
class. By default it acceptSubtypes=“true” which means it will accept all sub
class of main class but if it will set as false acceptSubtypes=“false” then during
execution the operation throws an error (JAVA:WRONG_INSTANCE_CLASS)
Rajnish Kumar is CTO of Vanrish Technology with Over 25 years experience in different industries and technology. He is very passionate about innovation and latest technology like APIs, IOT (Internet Of Things), Artificial Intelligence (AI) ecosystem and Cybersecurity. He present his idea in different platforms and help customer to their digital transformation journey.
Mulesoft Connect 2019 was wrapped last month in North america. These connects are one of the premier conferences for API led connectivity and digital transformation.These conference brought more content for developers, architects, and business executives across different business domain. At MuleSoft CONNECT plethora of market experts, and business executives including industry’s CEO/CTO, discussed their Mulesoft experience and democratization of innovation.
During these conferences, I got an opportunity to talk to some business executives about their Mulesoft experiences and challenges.
One of the biggest challenges is to optimize Mulesoft vCore in cloudhub to keep their project in budget.
Here are few steps in Mulesoft application to keep vCore usage low and project in budget.
1. API Optimization — As per Mulesoft best practices, Mulesoft suggest API led connectivity to expose data to application within or outside of your organization through reusable and purposeful APIs.
The APIs used in an API-led approach to connectivity falls into three categories:
Experience APIs
Process APIs
System APIs
When you are working on API led connectivity, do we really need all three layers of APIs every time?
No, It is not necessary to implement all three layers of APIs every time.
API Layers
Here are some of API layers use-case to save vCores usage and optimize APIs led connectivity.
Experience APIs — Experience API is similar to process APIs but unlike Process APIs, Experience APIs are more specifically tied to a unique business context, and project data formats, interaction timings, or protocols into a specific channel and context. These APIs simplifies your front end data, based on different GUI. For example if you are working on PC website or Mobile website, we display data based on user experience, so we need different APIs to show these data, but if your application needs only data irrespective of user experience we can skip Experience APIs and application can work only on Process APIs or System APIs. This will save some vCores and keep project in budget.
Process APIs — Process APIs, if you are working on complex business logic based on different organization department then you can incorporate all these business specific data in process layer and expose these data through process APIs. But if APIs are not incorporating any complex business logic and most of datas are processing through System APIs then in this use-case you can skip Process APIs and expose your data through System APIs. In this way you can save some vCore and keep your project within budget.
2. Salesforce Platform Events Integration – Salesforce integration with Mulesoft is one of the very common integration use-cases. In the old days Salesforce synced their data through polling. Poll run couple of time in whole day and sync data between different salesforce org. Since this is polling process, it is not easy to predict the volume of data flowing through Mulesoft application during a certain period of time. So in this case, we go with higher mulesoft vCore to avoid any memory leak.
Salesforce introduced “Platform Events” the Salesforce Enterprise Messaging Platform on June 2017. After introduction of “Platform Event”, integration of Mulesoft and salesforce has become very easy. “Platform Event” enterprise messaging service is event based. So any update for any create Object within salesforce generates event and sends payload to salesforce messaging queue. Mulesoft-Salesforce connector read these payload for data sync from Salesforce messaging queue FIFO based. Since this integration is event based, so as soon as Mulesoft receives event from “Platform event” it is processes Platform event message. So any time we have no large set of data to process. In this integration then we can go for lower vCore and execute project within budget.
3. Batch Process Optimization — Mulesoft allows to process messages in batch. Mule batch process provides a construct for asynchronous processing larger-than-memory data sets that can split into individual records. Mulesoft batch extracting, transforming and loading (ETL) information into a target system like hadoop.
Mulesoft needs large memory/vCore to run large sets of data in batch process. These Mulesoft batch process runs max once or twice a day . These Mulesoft batch hold large number of vCore idle rest of day without any active usage. You can optimize vCore usage and reduce your batching processing cost by following these two steps.
Reuse vCore by deploying multiple batch process applications — As you know, batch run certain time of day once or twice. Suppose one batch application is running every midnight and other batch application is running every morning . Both your batch application is taking 1 vCore. So both applications consuming total 2 vCore.
If you are configuring any CI/CD process like Jenkin/Code build to deploy your batch application into cloud then it is very easy to manage your process to reuse your vCore. Your can configure you CI/CD process to build your application and deploy your application into cloud when you want to run batch. Once batch is done then you un-deploy your application and deploy next batch application on same memory. In this way you can keep reusing your vCore memory and keep your project within budget.
Deploy Batch application in on-premise Mulesoft server — As we all know Batch process is simple and easy to maintain application in most to their use-case. In this case it is very easy to maintain on-premise Mulesoft server and deploy your batch application without much worry about vCore usage.
Rajnish Kumar is CTO of Vanrish Technology with Over 25 years experience in different industries and technology. He is very passionate about innovation and latest technology like APIs, IOT (Internet Of Things), Artificial Intelligence (AI) ecosystem and Cybersecurity. He present his idea in different platforms and help customer to their digital transformation journey.
Fiscal year 2019, government estimated $45.8 billion on IT investments at major civilian agencies, which will be used to acquire, develop, and implement modern technologies.78% of this budget goes to maintain existing IT system. In a constantly changing IT landscape, the migration of federal on-premise technologies to the cloud is increasing every year. Federal agencies have the opportunity to save money and time by adopting innovative cloud services to meet their critical mission needs and keep up to date with current technology. Federal agencies are required by law to protect any federal information that is collected, maintained, processed, disseminated, or disposed of by cloud service offerings, in accordance with FedRAMP requirements.
What is Federal Risk and Authorization Management Program (FedRamp) ?
FedRamp is a US government-wide program that delivers a standard approach to security assessment, authorization, and continuous monitoring for cloud products and services. The stakeholders for FedRamps are
Federal Agencies
FedRamp PMO & JAB(Joint Authorization Board)
Third Party Assessment Organization
FedRamp Process— There are 3 ways a cloud service can be proposed for FedRamp Authorization.
Cloud BPA — Cloud Services through FCCI BPAs
Government Cloud Systems — Services must be intended for use by multiple government or government approved agencies.
Agency Sponsorship — This is the most popular route for cloud service providers (CSPs) to take when working toward a FedRAMP Authorization. CSP to establish a partnership with an Agency and agree to work together for an Authority to Operate(ATO).
Mulesoft FedRAMP Authorize Integration Platform
Mulesoft recently announced, FedRAMP process implementation of Anypoint Platform. MuleSoft is one of the first integration platform companies with FedRamp authorization and enabling both on-premises and cloud integration in the federal government and state government. Enablement of FedRamp of Mulesoft Anypoint platform, government IT teams can leverage the same core Anypoint Platform benefits in the cloud to accelerate their project delivery via reusable APIs.Anypoint Platform allows all government integration assets to be managed and monitored from a single, secure, cloud based management console, simplifying operations and increasing IT agility.
Mulesoft Anypoint platform enables FedRamp-compliant iPAAS for government organization. Government IT integration project deploy in Anypoint platform within Mulesoft Government cloud
Accelerate government IT project deliveries by deploying sophisticated cross-cloud integration applications and create new APIs on top of existing data sources
Project deliveries improve efficiencies at lower cost by allowing IT integration teams to focus on designing, deploying, and managing integrations in the cloud and allowing agencies to only pay for what they use, .
Reduce risk of your IT project integration and increase application reliability by using of self-healing mechanism to recover from problems and load balancing.
What is Mulesoft Government Cloud?
Mulesoft government cloud is a FedRamp-compliant, cloud based deployment environment for Anypoint platform.
It is built on AWS GovCloud with FedRamp control.
Mule Runtimes configured in secure mode to support the highest encryption standards and FIPS(Federal Information Processing Standard) 140-2 hardware and software encryption compliance.
It is FedRamp-compliance at the moderate impact level.
It is continuous 3rd party(3 POs) auditing and monitoring of security control.
If you are accessing FedRamp-compliant Anypoint platform, after logging you get end user agreement as a consent. It is very typical for FedRamp-compliant government application.
Conclusion — Executing any government or state project and working on different integration as well as API enablement, FedRamp-compliant Anypoint platform is one of the best options. It accelerate IT project deliveries, improve efficiencies and reduce IT risk .
Rajnish Kumar is CTO of Vanrish Technology with Over 25 years experience in different industries and technology. He is very passionate about innovation and latest technology like APIs, IOT (Internet Of Things), Artificial Intelligence (AI) ecosystem and Cybersecurity. He present his idea in different platforms and help customer to their digital transformation journey.
Mulesoft is all about API strategy and digital transformation of your organization through APIs within cloudHub or in premise. Mulesoft also provides platform for APIs to monitor and analyze the usage, control access and protect sensitive data with security policies. API is at the heart of digital transformation and it enables greater speed, flexibility and agility of any organization.
Exposing of your APIs is one aspect of your digital transformation strategy, but consuming API is also as important as exposing APIs. Consuming API is either application getting data from APIs or create/update data through APIs. Most of APIs are based on HTTP/HTTPS protocol. In Mule 4 consuming APIs is also start with configuration of HTTP/HTTPs protocol.
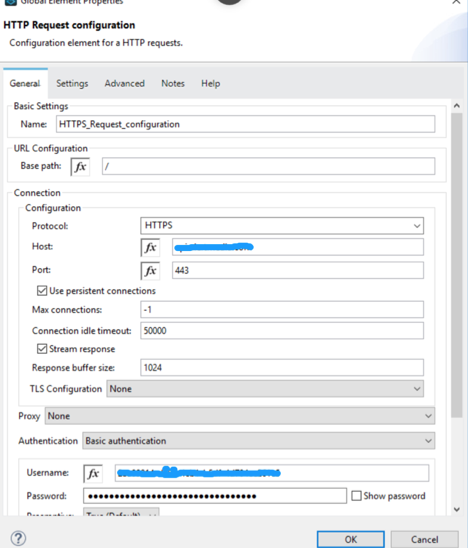
Configuration of HTTP/HTTPS— HTTP/HTTPS configuration start with selecting protocol. If API is available through HTTP then select protocol HTTP with default port 80 or change port based on expose API document. If APIs are available through secured connection, then select HTTPS protocol with default port 443. Fill the Host with your expose API end point without any protocol. Fill the other field with default value.
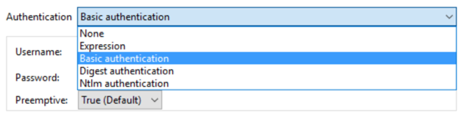
Authentication of API are available with five different selection
None – No authentication. Available
for everyone
Expression – Custom or expression-based
authentication
Digest authentication — web server
can use to negotiate credentials, such as username or password, with a user’s
web browser
Ntlm authentication — NT (New
Technology) LAN Manager (NTLM) . Microsoft security protocols intended to
provide authentication, integrity, and confidentiality to users
If you are working on post/patch/put method api to send data into expose api, set some important parameter based on streaming mode. If API are exposed as streaming mode, then you need to mention content-size of streaming otherwise set value as “NEVER”, then you no need to set content-size.
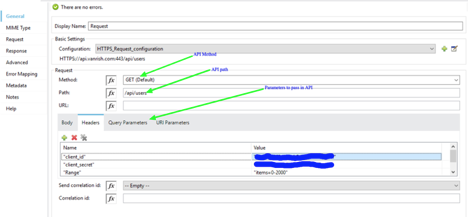
API Get Call – API get call implement GET method of APIs. Implementation of API get call need parameters. Based on these parameters application get set of data. MuleSoft provide 4 ways to pass these parameters or values.
Body
Headers
Query Parameters
URI Parameters
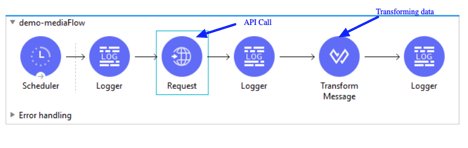
Flow for GET Method
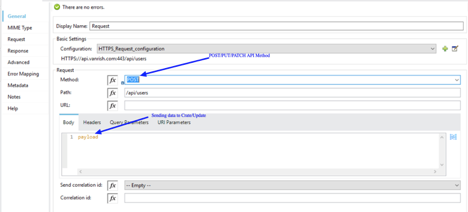
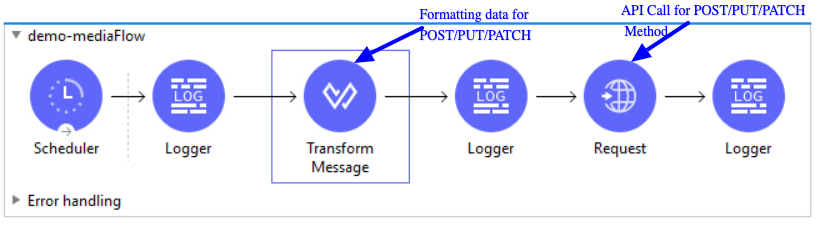
API POST/PUT/PATCH Call –
POST – Create data
PUT/PATCH – Update data
Similar to Get method call, for POST/PUT/PATCH method application send API parameters based on API requirement. Since application is creating/Updating data through POST/PUT/PATCH api call, application sends these data through body parameters with content-type.
Rajnish Kumar is CTO of Vanrish Technology with Over 25 years experience in different industries and technology. He is very passionate about innovation and latest technology like APIs, IOT (Internet Of Things), Artificial Intelligence (AI) ecosystem and Cybersecurity. He present his idea in different platforms and help customer to their digital transformation journey.
Mule 4 introduced APIKit for soap webservice. It is very similar to APIKit for Rest. In SOAP APIKit, it accepts WSDL file instead of RAML file. APIKit for SOAP generates work flow from remote WSDL file or downloaded WSDL file in your system.
To create SOAP APIKit project, First create Mulesoft project with these steps in Anypoint studio.
Under File Menu -> select New -> Mule Project
Mule 4 Project Settings
In above pic WSDL file gets selected from local folder to create Mule Project.
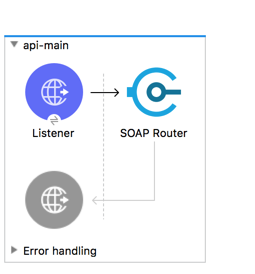
Once you click finish, it generates default APIKit flow based on WSDL file.
In this Mulesoft SOAP APIKit example project, application is consuming SOAP webservice and exposing WSDL and enabling SOAP webservice.
Mule 4 API Kit for Soap Router
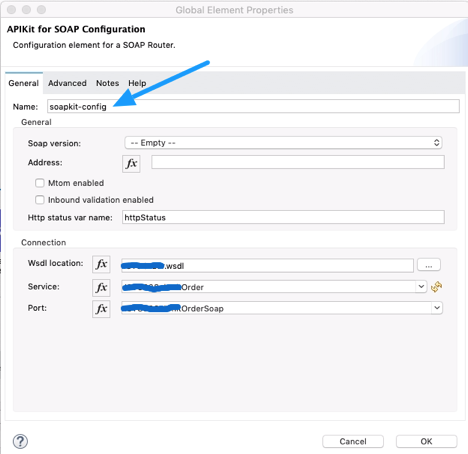
In SOAP Router APIKit, APIKit SOAP Configuration is defined WSDL location, Services and Port from WSDL file.
API Kit SOAP configuration
In above configuration, “soapkit-config” SOAP Router look up for requested method. Based on requested method it reroutes request from api-main flow to method flow. In this example, requested method is “ExecuteTransaction” from existing wsdl, so method flow name is
<flow name=“ExecuteTransaction:\soapkit-config”>
In this example we are consuming same WSDL but end point is different.
To call same WSDL we have to format our request based on WSDL file. In dataweave, create request based on WSDL and sending request through HTTP connector.
Here is dataweave transformation to generate request for existing WSDL file
Rajnish Kumar is CTO of Vanrish Technology with Over 25 years experience in different industries and technology. He is very passionate about innovation and latest technology like APIs, IOT (Internet Of Things), Artificial Intelligence (AI) ecosystem and Cybersecurity. He present his idea in different platforms and help customer to their digital transformation journey.
When I started my career, there was Y2K issue going on. Every company was trying to convert
their data to be compatible with
upcoming Y2K. In that era, all companies without any 2nd thought
were allocating their budgets in these projects. They wanted to make their systems compatible to Y2K as soon as possible.
Currently
companies are going through same situation. This time it is Digital transformation. All industries
want to enable digital transformation to expand their business. Digital transformation
is touching every company in every industry. But CEOs and CTOs have big
challenge to enable data for business and drive their company towards digital
transformation.
Suppose
you are in supply chain industries and your data is sitting in some legacy
system. So in this case there is no use
of data. Business will not be able to
run any analytic on this data so that business can identify customer behavior
or new business opportunity. It will not be able to add any business value with
this data. Company can go out of business due to this lack of vision and data
transformation. In this fast pace world,
keeping relevant to your customer it is very necessary to your business to move
your data fast and enable new business opportunity.
Here are few challenges CTO’s/Architect are facing to enable
their data transformation and delivering innovation.
All systems are not delivering seamless
experience within organization. Every department is working independently.
There is Lack of support for 360 degree view of
customer or an agent from the various touch points of business.
Duplicate data between systems and lack of data
transparency.
Growing need of security and compliances are not
implemented with growing business.
Here are some of steps to achieve your company’s digital
transformation vision.
1. Establish digital vision – If you are leading your company towards digital transformation, it is very necessary that you have very clear vision and strategy around your business requirement. Give training to all stakeholder to embrace new changes due to digital transformation. Engage business leadership in developing a business capability roadmap.
2. Seamless experiences –
Establish seamless experience via user experience design, mobile, agent, customer
and service center. Interface need to be fast and provide self service
capability. Enable single source of information available system-wide through
the API-based integration layer.
3. 360 degree customer
view – Setup some process to get a complete view of customers by
aggregating data from the various touch points that a customer may use to
contact a company to purchase products and receive service and support. Data
assets are buried in the data center. APIs bring these data in front of
the people who need it to drive new products and new digital services for
customers and provide 360 degree view of this data.
4. Embrace
the Cloud – Cloud is providing a platform to accelerate company digital transformation
journey.Companies are innovating very
fast in cloud. They are taking advantage of lower coast and fast deliverable of
cloud without worry about IT infrastructure. They are moving data and enable
data for artificial Intelligence and analytics through less roll out time of
cloud.
Conclusion – Better
digital transformation strategy brings better workspace and increase in stakeholder
involvement. It increase productivity and bring more innovation for your
business.
Rajnish Kumar is CTO of Vanrish Technology with Over 25 years experience in different industries and technology. He is very passionate about innovation and latest technology like APIs, IOT (Internet Of Things), Artificial Intelligence (AI) ecosystem and Cybersecurity. He present his idea in different platforms and help customer to their digital transformation journey.
Much awaited Mulesoft 4 was officially announced in Mulesoft
Connect 2018 in San Jose. When Mulesoft was born, it was really to create
software that helps to interact systems or source of information quickly within
or outside company. So the speed is an incredibly important thing over the
years to develop and interact within systems. Need of speed for application and
development hasn’t change drastically over the years but needs and requirement
of customer’s application have changed. The integration landscape has also
magnified. There are hundreds of new systems and sources of information to
connect to, with more and more integration requirements. This integration
landscape gets very messy and very quickly.
Mule 4 provides
a simplified language, simplified runtime engine and ultimately reduces
management complexity. It helps
customers, developers to deliver application faster. Mule4 is really radically
simplified development. It is providing new tool to simplify your development,
deployment and management of your integration/API. It is also providing a
platform to reuse Mule component without affecting existing application for
faster development. Mule 4 is evolution of Mule3. You will not seem lost in
Mule 4, if you are coming from Mule3. But Mule 4 implements fewer concepts and
steps to simplify whole development/integration process. Mule 4 has now java
skill is optional. In this release Mulesoft is improving tool and making error
reporting more robust and platform independent.
Now let’s go one by one with all these new Mule4 features.
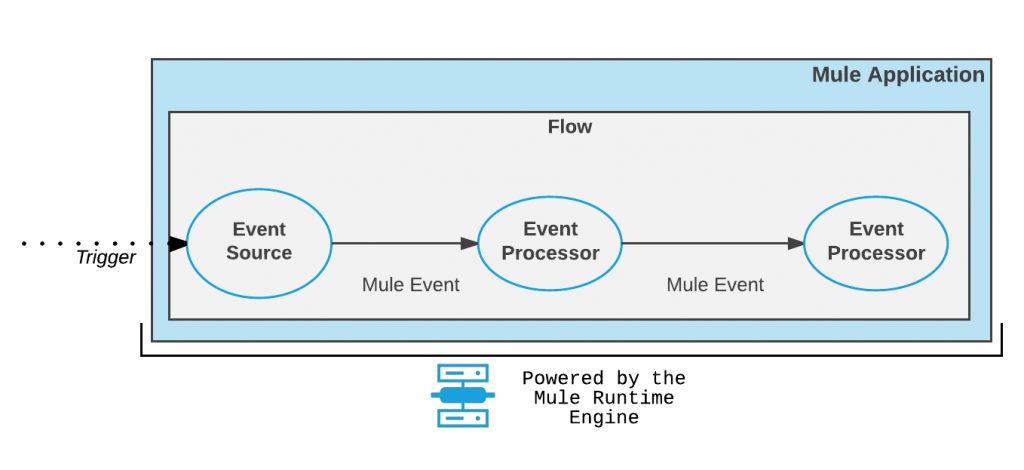
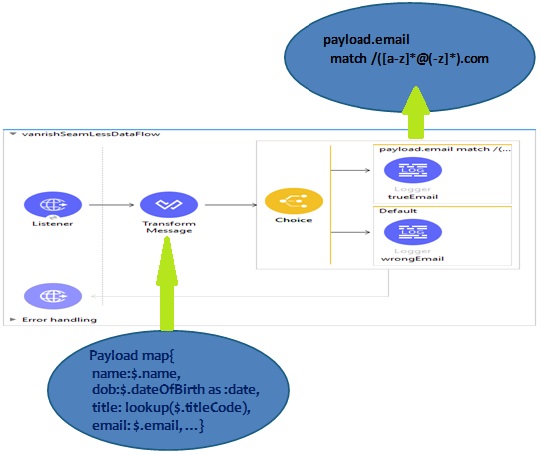
1. Simplified
Event Processing and Messaging — Mule event is
immutable, so every change to an instance of a Mule event results in the
creation of a new instance.It contains the core
information processed by the runtime. It travels through components inside your
Mule app following the configured application logic. A Mule event is generated when a trigger (such as an
HTTP request or a change to a database or file) reaches the Event source of a
flow. This trigger could be an external event triggered by a resource that
might be external to the Mule app.
Mule 4 Event flow
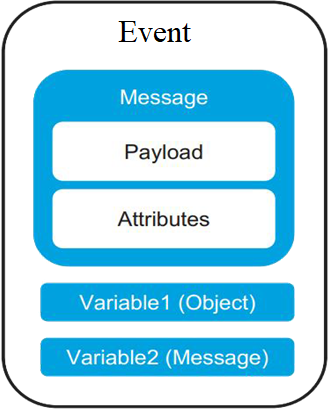
2. New
Event and Message structure — Mule 4 includes a
simplified Mule message model in which each Mule event has a message and
variables associated with it. A Mule message is
composed of a payload and its attributes (metadata, such as file size).
Variables hold arbitrary user information such as operation results, auxiliary
values, and so on.
Mule 4 message
Mules 4 do not have Inbound, Outbound and Attachment
properties like Mule 3. In mule 4 all information
are saved in variables and attributes. Attributes in Mule 4 replace inbound properties. Attributes
can be easily accessed through expressions.
These
are advantages to use Attributes in
Mule 4.
They are strongly typed, so you can easily see
what data is available.
They can easily be stored in variables that you
can access throughout your flow
Example :
#[attributes.uriParams.jobnumber]
Outbound properties— Mule 4 has no concept for outbound properties like in Mule 3. So you can set status code response or header information in Mule 4 through Dataweave expression without introducing any side effects in the main flow.
Session Properties–In Mule 4 Session properties are no longer exist. Data store in variables are passes along with different flow.
3. Seamless data access & streaming – Mule 4 has fewer concepts and steps. Now every steps and task of java language knowledge is optional.Mule 4 is not only leveraging DataWeave as a transformation language, but expression language as well. For example in Mule 3 XML/CSV data need to be converted into java object to parse or reroute them. Mule 4 gives the ability to parse or reroute through Dataweave expression without converting into java. These steps simplify your implementation without using java.
Mule 4 Data Access
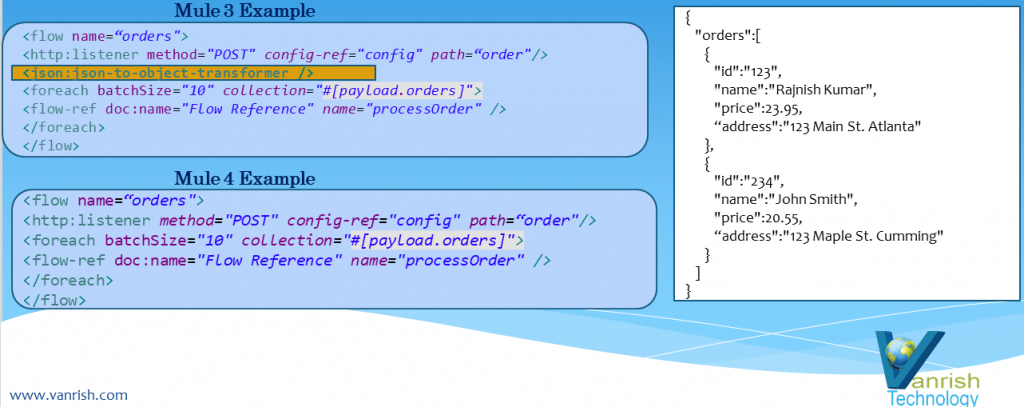
4. Dataweave 2.0 — Mule 4 introduces DataWeave as the default
expression language replacing Mule Expression Language (MEL) with a scripting
and transformation engine. It is combined with the built-in streaming
capabilities; this change simplifies many common tasks. Mule 4
simplifies data iteration. DataWeave knows how to iterate a json array. You
don’t even need to specify it is json. No need to use <json:json-to-object-transformer /> to convert data into java object.
Mule 4 vs Mule 3 flow comparison
Here are few points about Dataweave 2.0
Simpler syntax to learn
Human readable descriptions of all data types
Applies complex routing/filter rules.
Easy access to payload data without the need for
transformation.
Performs any kind of data transformation,
normalization, grouping, joins, pivoting and filtering.
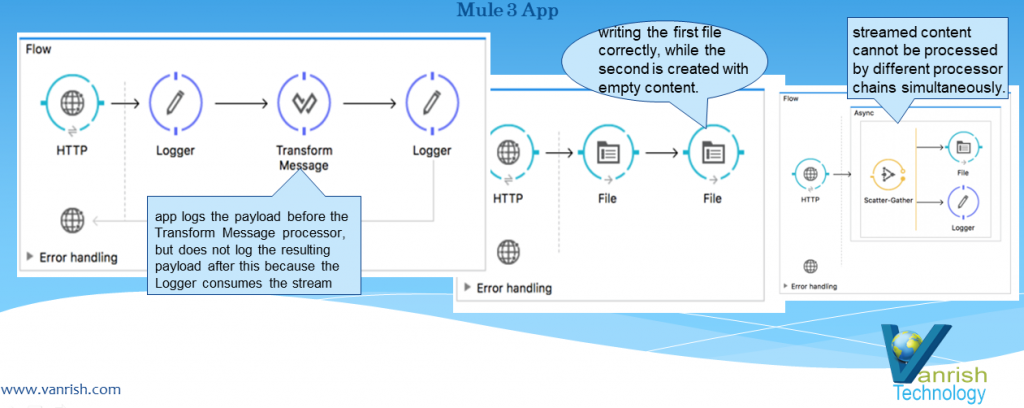
5. Repeatable
Streaming – Mule 4 introduces
repeatable streams as its default framework for handling streams. To understand
the changes introduced in Mule 4, it is necessary to understand how Mule3 data
streams are consumed
Mule 3 data streaming examples
In above three different Mule 3 flows, once stream data is
consumed by one node it is empty stream for 2nd node. So in the above
first example, in order to log the stream payload , the logger has to consume
the entire stream of data from HTTP connector. This means that the full content
will be loaded into memory. So if the content is too big and you’re loading
into memory, there is a good chance the application might run out of memory.
So Mule 4 repeatable streams enable you to
Read a stream more than once
Have concurrent access to the stream.
Random Access
Streams of bytes or streams of objects
As a component consumes the stream, Mule saves its content
into a temporary buffer. The runtime then feeds the component from the
temporary buffer, ensuring that each component receives the full stream,
regardless of how much of the stream was already consumed by any prior
component
Here are few points, how repeatable streams works in Mule 4
Payload
is read into memory as it is consumed
If
payload stream buffer size is > 512K (default) then it will be persisted to
disk.
Payload
stream buffer size can be increased or decreased by configuration to optimize
performance
Any
stream can be read at any random position, by any random thread concurrently
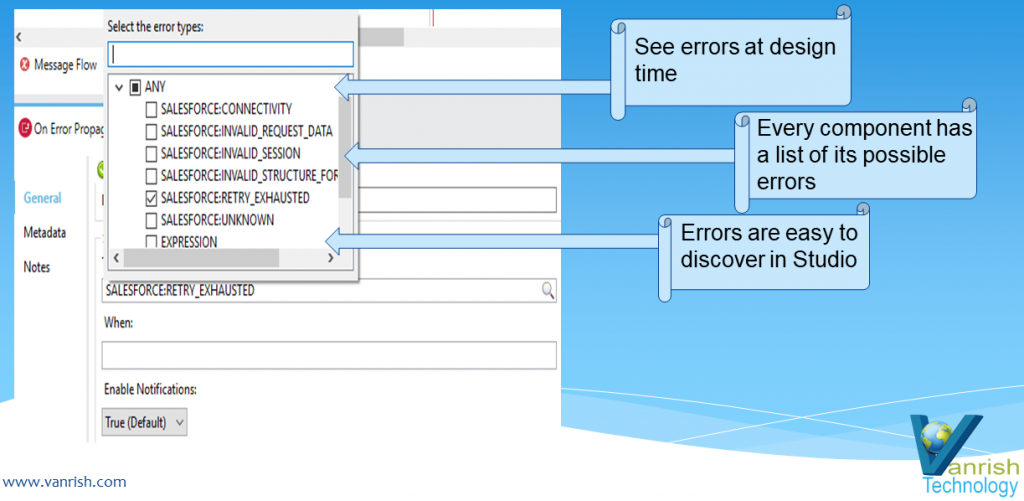
6. Error Handling — In Mule 4 error handling has been changed
significantly. Now In mule 4 you can discover errors at design time with visual
interface. You no need to deal with java exception directly and it is easy to
discover error while you are building flow. Every flow listed all possible
exception which potential arises during execution.
Mule 4 Error Handling
Now errors that occur
in Mule fall into two categories
Messaging errors
System errors
Messaging errors — Mule throws a messaging error (a Mule error) whenever a problem occurs within a flow. To handle Mule
errors, you can set up On Error components inside the scope-like Error Handler
component. By default, any unhandled errors are logged and propagated.
System errors — Mule throws a system error when an exception occurs
at the system level . If no Mule Event is involved, the errors are handled by a
system error handler.
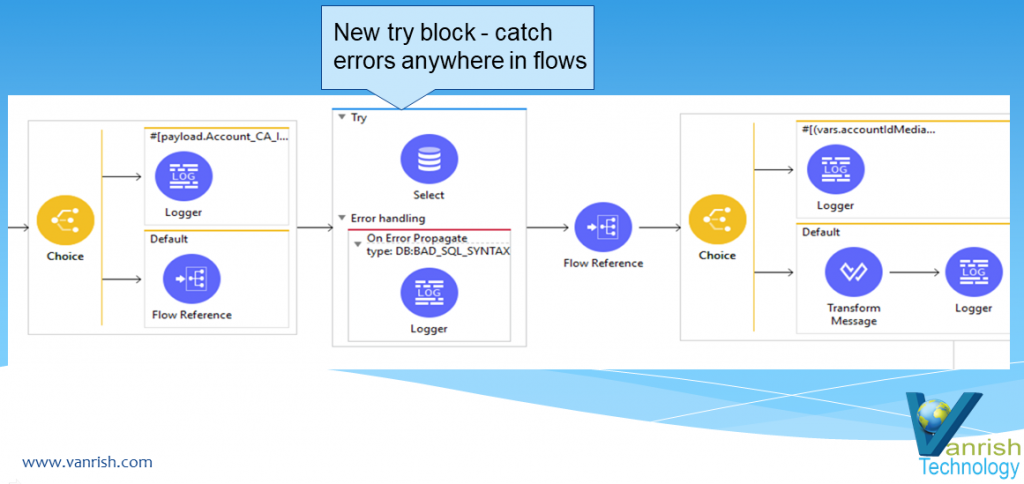
Try catch Scope — Mule 4 introduces a new try scope that you can use within a flow to do error handling of just inner components/connectors. This try scope also supports transactions and in this way it is replacing Old Mule 3 transaction scope.
Mule 4 A new try catch block
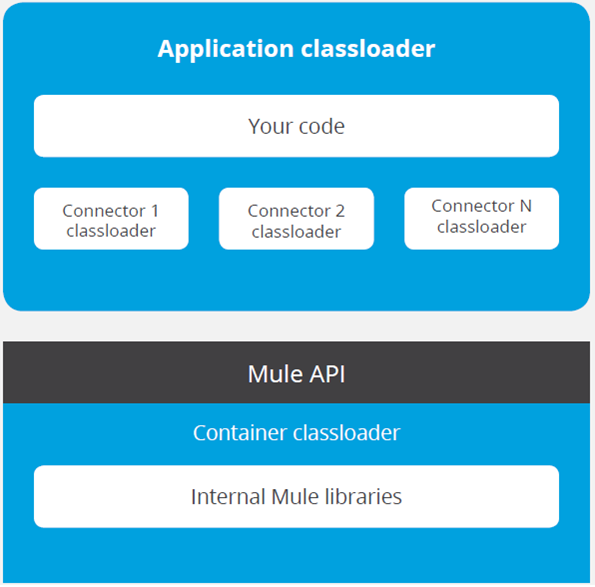
7. Class Loader Isolation — Class loader separates application completely from
Mule runtime and connector runtime. So, library file changes (jar version) do
not affect your application. This also
gives flexibility to your application to run any Spring version without worry
about Mulesoft spring version. Connectors are distributed outside the runtime
as well, making it possible to get connector enhancements and fixes without
having to upgrade the runtime or vice versa
In above pic showing that every component in any application have their own class loader and running independently on own class loader.
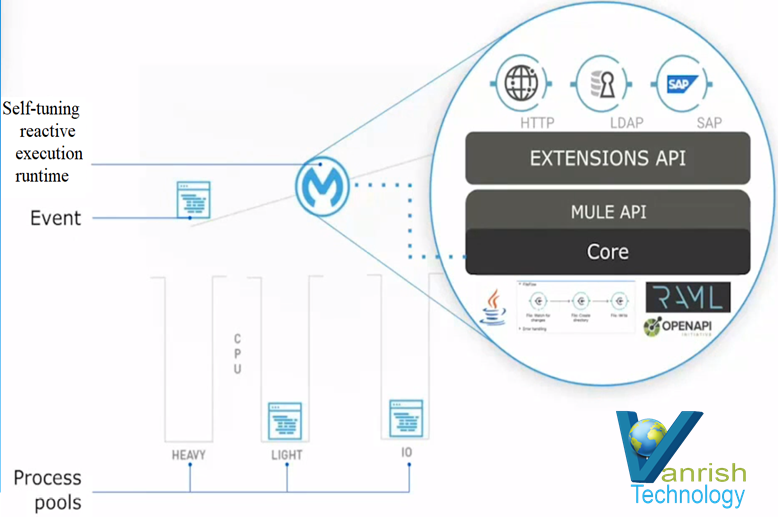
8. Runtime Engine — Mule 4 engine is new reactive and non-blocking engine. In Mule 4 non-blocking flow always on, so no processing strategy in flow. One best feature of Mule 4 engine is, It is self-tuning runtime engine. So what does this mean? If Mule 4 engine is processing your applications on 3 different thread pools, So runtime knows which application should be executed by each thread pool. So operation put in corresponding thread pool based on high intensive CPU processing or light intensive CPU processing or I/O operation. Then 3 pools are dynamic resizing automatically to execute application through self-tuning.
Mule 4 : Self tuning run time engine
So now self-tuning creates custom thread pools based on specific tasks. Mule 4 engine makes it possible to achieve optimal performance without having to do manual tuning steps.
Conclusion
Overall Mule 4 is
trying to make application development easy, fast and robust. There are more features
included in Mule 4 which I will try to cover in my next blog. I will also try
to cover more in depth info in above topic of Mule 4. Please keep tuning for my
next blog.
Rajnish Kumar is CTO of Vanrish Technology with Over 25 years experience in different industries and technology. He is very passionate about innovation and latest technology like APIs, IOT (Internet Of Things), Artificial Intelligence (AI) ecosystem and Cybersecurity. He present his idea in different platforms and help customer to their digital transformation journey.