Anypoint Platform acts as a client provider by default, but you can also configure external client providers to authorize client applications. As an API owner, you can apply an OAuth 2.0 policy to authorize client applications that try to access your API. You need an OAuth 2.0 provider to use an OAuth 2.0 policy. You can configure more than one client provider and associate the client providers with different environments. If you configure multiple client providers after you have already created environments, you can associate the new client providers with the environment.
MuleSoft supports client management by identity providers that implement the OpenID Connect Dynamic Client Registration open standard. MuleSoft explicitly verifies support in Anypoint Platform for Salesforce, Okta, and OpenAM v14 Dynamic Client Registration. The following table contains examples of the URLs you need to supply, depending on your provider, during registration.
URL Name
Okta Example URL
OpenAM Example URL
Salesforce Example URL
Base
https://example.okta.com/oauth2/v1
https://example.com/openam/oauth2
https://example.salesforce.com/services/oauth2
Client Registration
{BASE URL}/clients
{BASE URL}/connect/register
{BASE URL}/register
Authorize
{BASE URL}/authorize
{BASE URL}/authorize
{BASE URL}/authorize
Token
{BASE URL}/token
{BASE URL}/access_token
{BASE URL}/token
Token Introspection
{BASE URL}/introspect
{BASE URL}/introspect
{BASE URL}/introspect
URL Name
Okta Example URL
OpenAM Example URL
Salesforce Example URL
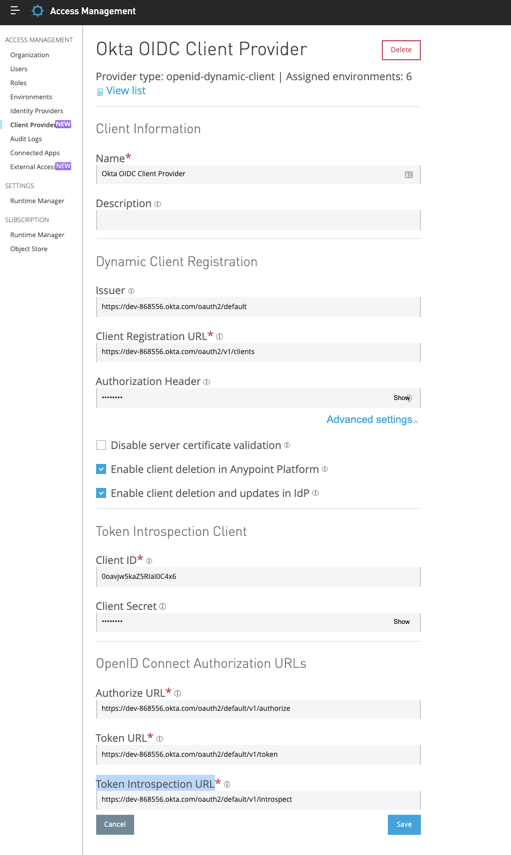
Steps to Create External Client Provider
Log in to Anypoint Platform using an account that has the organization administrator role.
In Anypoint Platform, click Access Management.
In the menu on the left, click Client Providers.
Click Add Client Provider, and then select OpenID Connect Dynamic Client Registration. The Add OIDC client provider page appears.
After obtaining values from your identity provider’s configuration, complete the following required fields in each section:
Dynamic Client Registration
Issuer: URL that the OpenID provider asserts is its trusted issuer.
Client Registration URL: The URL to dynamically register client applications as a client application for your identity provider.
Authorization Header
For Okta, this value is SSWS ${api_token}, where api_token is an API token created through Okta.
For ForgeRock, this value is Bearer ${api_token}, where api_token is an API token created through ForgeRock.
For Salesforce, this value is Bearer ${api_token}, where api_token is an API token created through Salesforce. In Advanced Settings you can also select:
Disable server certificate validation: Disables server certificate validation if your OpenID client management instance presents a self-signed certificate, or one signed by an internal certificate authority.
Enable client deletion in Anypoint Platform: Enables deletion of clients created with this integration.
Enable client deletion and updates in IdP: To use this option, you must also select the Enable client deletion in Anypoint Platform option.
Token Introspection Client
Client ID: The client ID for an existing client in your IdP capable of introspection of all tokens from all clients.
For Okta, this value should be a “Confidential” client.
For ForgeRock, this value should be a “Confidential” client.
For Salesforce, this value should be a “Confidential” client.
Client Secret: The client secret that corresponds to the client ID.
OpenID Connect Authorization URLs
Authorize URL: The URL where the user authenticates and grants OpenID Connect client applications access to the user’s identity.
Token URL: The URL that provides the user’s identity, encoded in a secure JSON Web Token.
Token Introspection URL: endpoint that returns metadata about the access token, including expiration and token active state.
Rajnish Kumar is CTO of Vanrish Technology with Over 25 years experience in different industries and technology. He is very passionate about innovation and latest technology like APIs, IOT (Internet Of Things), Artificial Intelligence (AI) ecosystem and Cybersecurity. He present his idea in different platforms and help customer to their digital transformation journey.
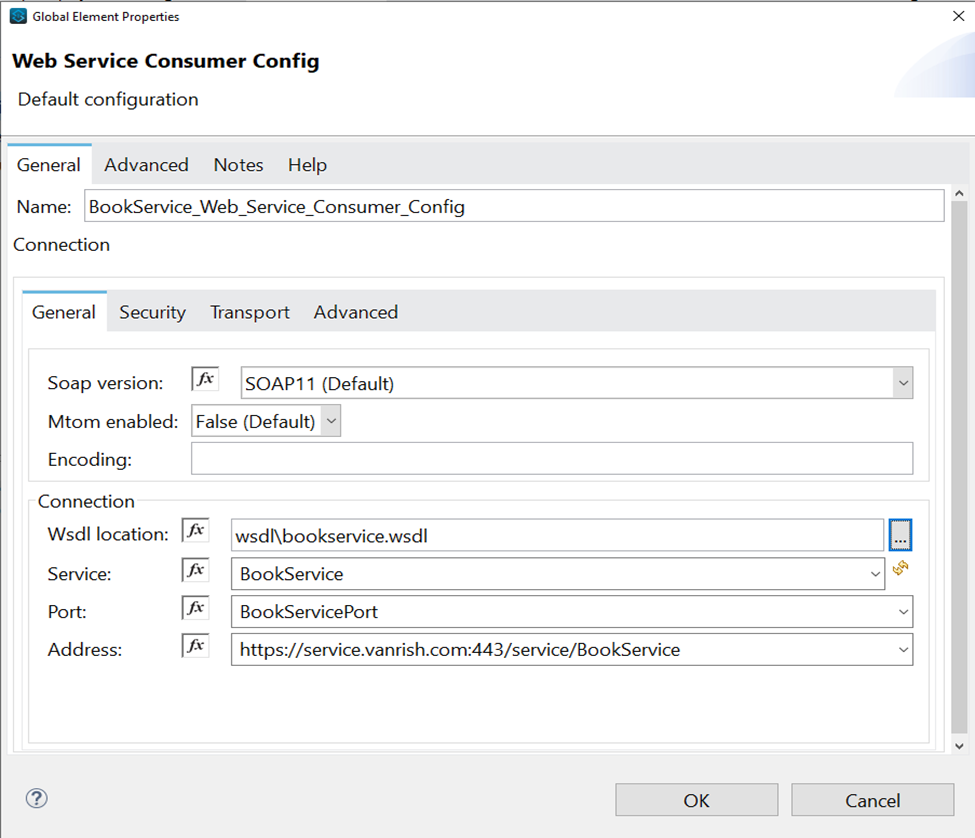
The Web Service Consumer is an existing connector in Mule 4 that you can configure to point to a SOAP based web service. Webservice consumer call webservice hosted elsewhere as WSDL SOAP services and get response. This connector simplified process and encapsulated all the feature to consume SOAP based webservice. When no connector is available specific to any product (like Service-Now, Workday etc.), which is hosted as SOAP based webservice then this webservice consumer Connector enables any services to consume.
The main feature of this connector is
Consuming
DOC Literal Web services.
SOAP
multipart messages.
SOAP
Headers.
DataSense
support for SOAP Headers, SOAP Body, and Attachment.
Embedded
DataWeave transformations inside the operation.
Support and
Unified experience for SOAP with attachments and MTOM handling.
Custom HTTP
configuration as transport (runtime and design time).
Web Service
Security (WS Security) support.
Connector Configuration- In this section we define connector configuration to communicate with SOAP based webservice end point. By default, connector uses a simple non protected HTTP configuration to send all outgoing SOAP message. In connector configuration you can select your SOAP version from drop down and provide WSDL location. Connector extract and populates Service, Port and webservice endpoint address from WSDL file.
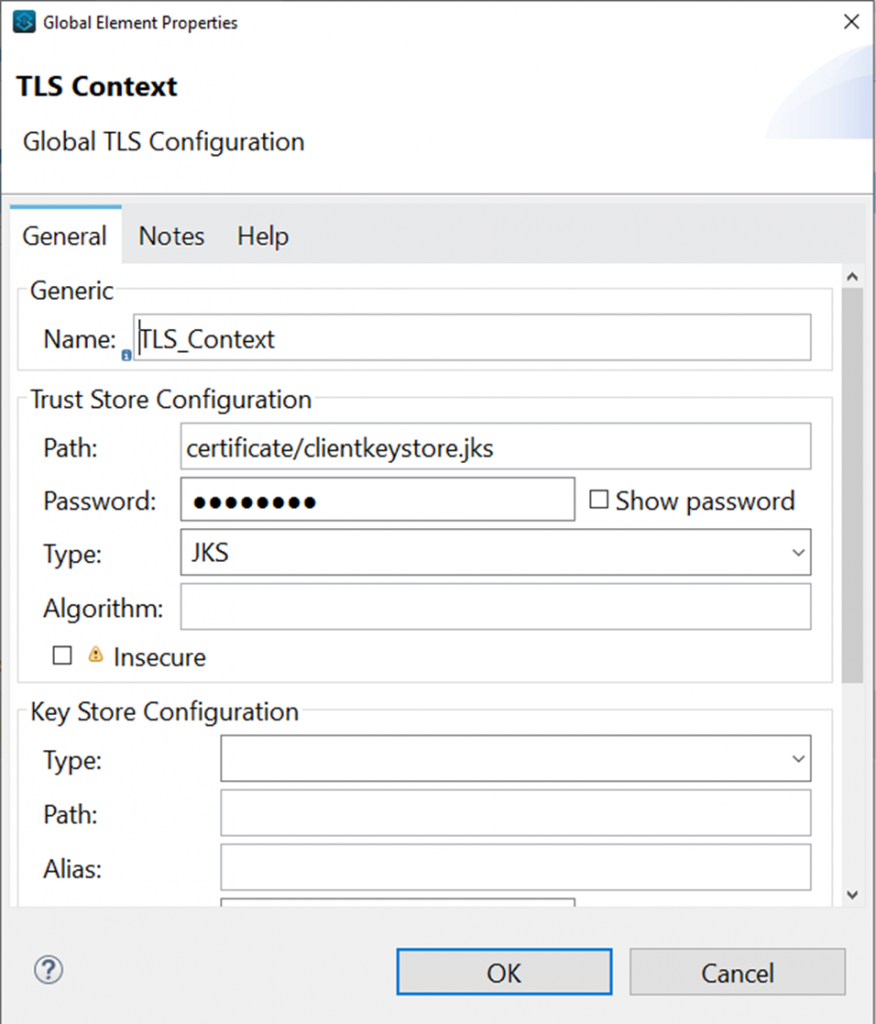
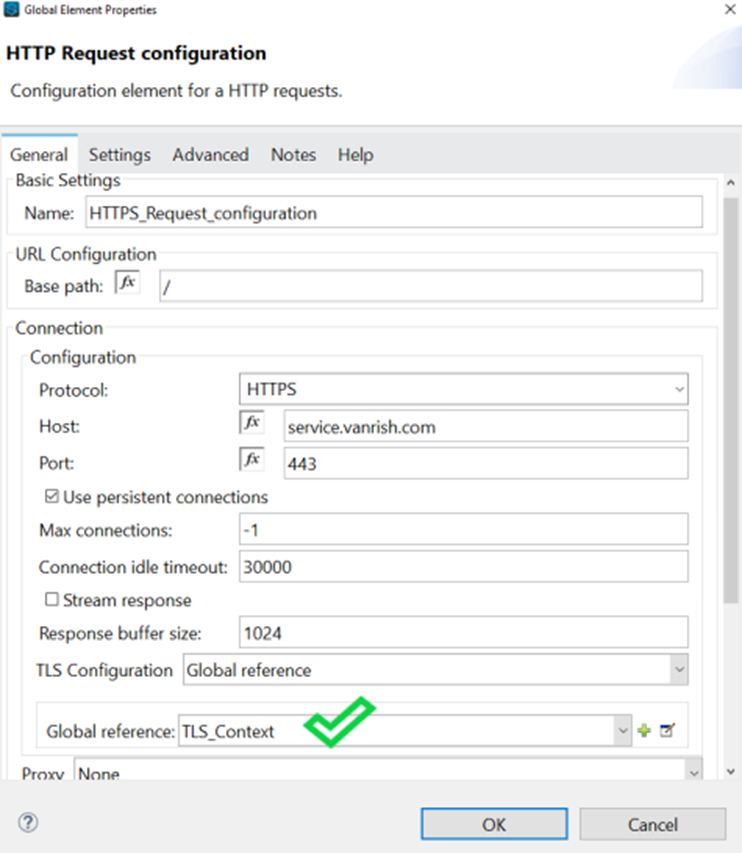
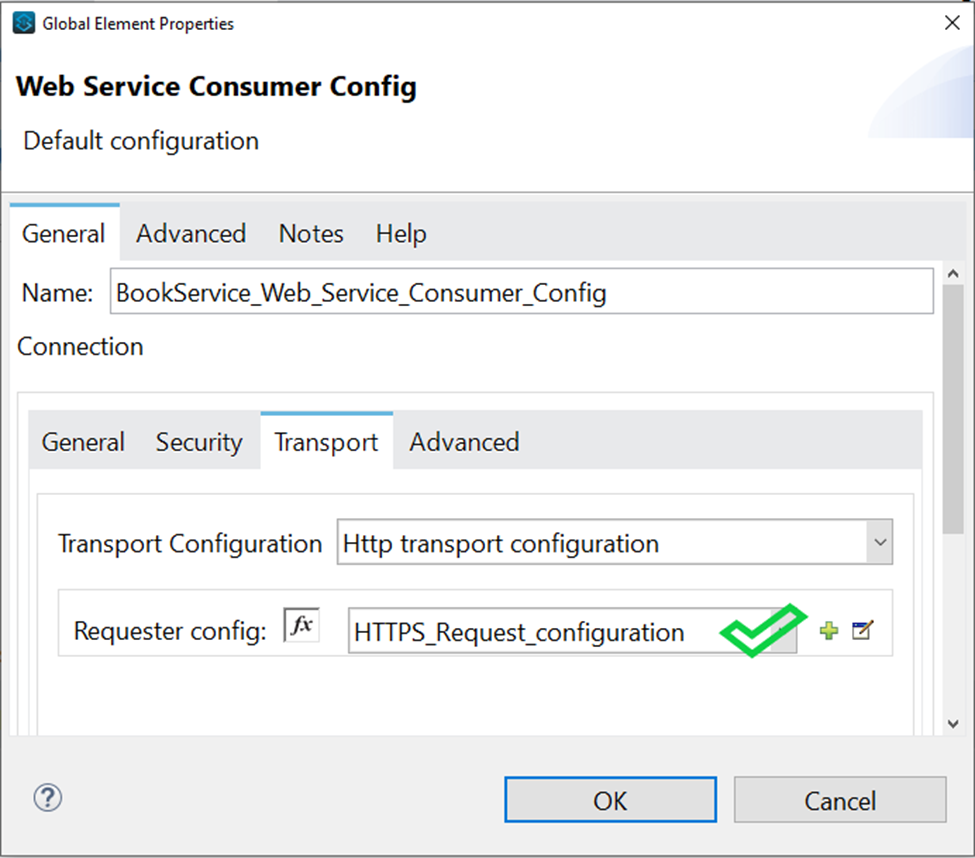
But if you are using secure endpoint address with HTTPS you need
to configure custom Transportation Configuration for HTTPS.
These are the steps to enable your secure HTTPS endpoint.
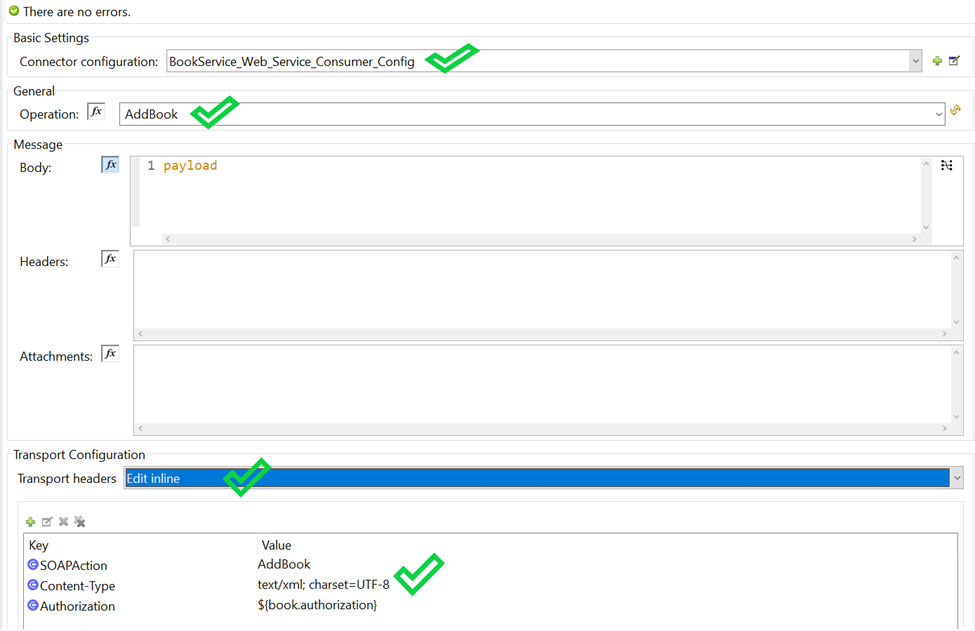
Connector Parameter- If connector configuration is configured properly, your operation parameters are available from WSDL as drop down options.
In
Message section there are three parameters available
Body – The Body is main part of the SOAP message. The body element accepts embedded DataWeave scripts as values so that you can construct the XML request without having a side effect on the message or having to use multiple components to create the request.
Headers – The headers element contains application-specific information (like authentication, payment, and so on) about the SOAP message . This elements accepts embedded DataWeave scripts as values.
Attachment – The attachments element enables you to bind attachments to the SOAP message. This element also accepts embedded DataWeave scripts as values.
Since you configured custom HTTPS connector for your webservice consumer Connector you can configure Transport Configuration. In Transport header section you can select “Edit inline” and add all your header parameters in line
Rajnish Kumar is CTO of Vanrish Technology with Over 25 years experience in different industries and technology. He is very passionate about innovation and latest technology like APIs, IOT (Internet Of Things), Artificial Intelligence (AI) ecosystem and Cybersecurity. He present his idea in different platforms and help customer to their digital transformation journey.
Mule 4 introduced APIKit for soap webservice. It is very similar to APIKit for Rest. In SOAP APIKit, it accepts WSDL file instead of RAML file. APIKit for SOAP generates work flow from remote WSDL file or downloaded WSDL file in your system.
To create SOAP APIKit project, First create Mulesoft project with these steps in Anypoint studio.
Under File Menu -> select New -> Mule Project
Mule 4 Project Settings
In above pic WSDL file gets selected from local folder to create Mule Project.
Once you click finish, it generates default APIKit flow based on WSDL file.
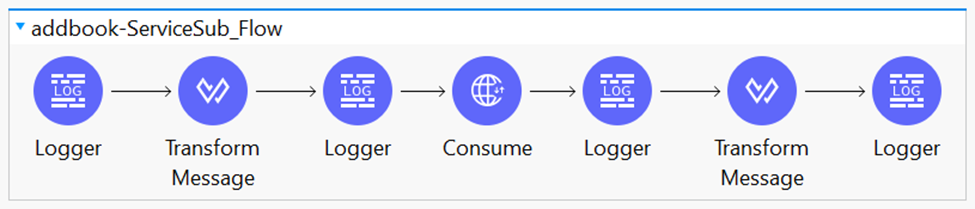
In this Mulesoft SOAP APIKit example project, application is consuming SOAP webservice and exposing WSDL and enabling SOAP webservice.
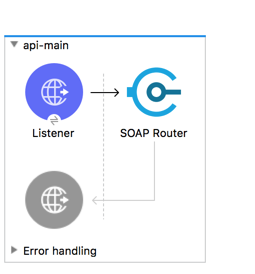
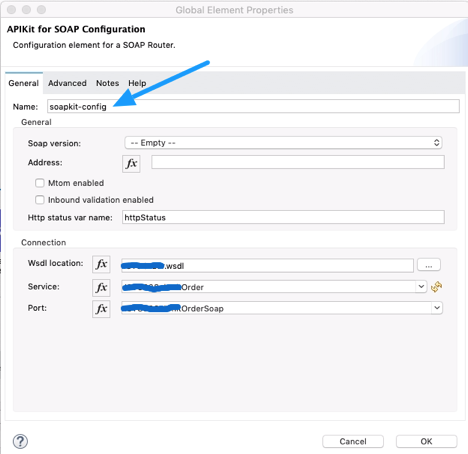
Mule 4 API Kit for Soap Router
In SOAP Router APIKit, APIKit SOAP Configuration is defined WSDL location, Services and Port from WSDL file.
API Kit SOAP configuration
In above configuration, “soapkit-config” SOAP Router look up for requested method. Based on requested method it reroutes request from api-main flow to method flow. In this example, requested method is “ExecuteTransaction” from existing wsdl, so method flow name is
<flow name=“ExecuteTransaction:\soapkit-config”>
In this example we are consuming same WSDL but end point is different.
To call same WSDL we have to format our request based on WSDL file. In dataweave, create request based on WSDL and sending request through HTTP connector.
Here is dataweave transformation to generate request for existing WSDL file
Rajnish Kumar is CTO of Vanrish Technology with Over 25 years experience in different industries and technology. He is very passionate about innovation and latest technology like APIs, IOT (Internet Of Things), Artificial Intelligence (AI) ecosystem and Cybersecurity. He present his idea in different platforms and help customer to their digital transformation journey.
Much awaited Mulesoft 4 was officially announced in Mulesoft
Connect 2018 in San Jose. When Mulesoft was born, it was really to create
software that helps to interact systems or source of information quickly within
or outside company. So the speed is an incredibly important thing over the
years to develop and interact within systems. Need of speed for application and
development hasn’t change drastically over the years but needs and requirement
of customer’s application have changed. The integration landscape has also
magnified. There are hundreds of new systems and sources of information to
connect to, with more and more integration requirements. This integration
landscape gets very messy and very quickly.
Mule 4 provides
a simplified language, simplified runtime engine and ultimately reduces
management complexity. It helps
customers, developers to deliver application faster. Mule4 is really radically
simplified development. It is providing new tool to simplify your development,
deployment and management of your integration/API. It is also providing a
platform to reuse Mule component without affecting existing application for
faster development. Mule 4 is evolution of Mule3. You will not seem lost in
Mule 4, if you are coming from Mule3. But Mule 4 implements fewer concepts and
steps to simplify whole development/integration process. Mule 4 has now java
skill is optional. In this release Mulesoft is improving tool and making error
reporting more robust and platform independent.
Now let’s go one by one with all these new Mule4 features.
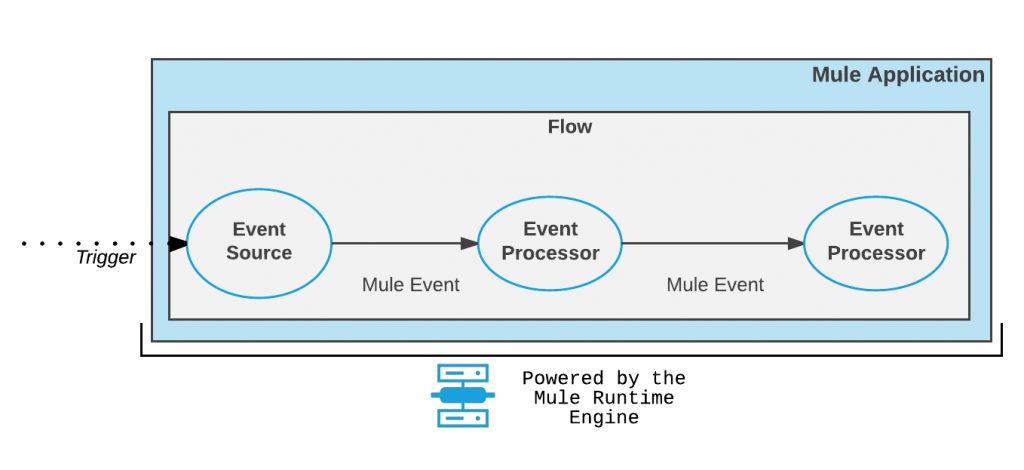
1. Simplified
Event Processing and Messaging — Mule event is
immutable, so every change to an instance of a Mule event results in the
creation of a new instance.It contains the core
information processed by the runtime. It travels through components inside your
Mule app following the configured application logic. A Mule event is generated when a trigger (such as an
HTTP request or a change to a database or file) reaches the Event source of a
flow. This trigger could be an external event triggered by a resource that
might be external to the Mule app.
Mule 4 Event flow
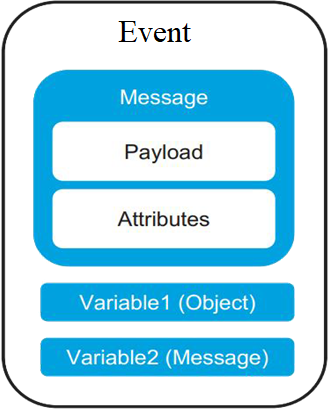
2. New
Event and Message structure — Mule 4 includes a
simplified Mule message model in which each Mule event has a message and
variables associated with it. A Mule message is
composed of a payload and its attributes (metadata, such as file size).
Variables hold arbitrary user information such as operation results, auxiliary
values, and so on.
Mule 4 message
Mules 4 do not have Inbound, Outbound and Attachment
properties like Mule 3. In mule 4 all information
are saved in variables and attributes. Attributes in Mule 4 replace inbound properties. Attributes
can be easily accessed through expressions.
These
are advantages to use Attributes in
Mule 4.
They are strongly typed, so you can easily see
what data is available.
They can easily be stored in variables that you
can access throughout your flow
Example :
#[attributes.uriParams.jobnumber]
Outbound properties— Mule 4 has no concept for outbound properties like in Mule 3. So you can set status code response or header information in Mule 4 through Dataweave expression without introducing any side effects in the main flow.
Session Properties–In Mule 4 Session properties are no longer exist. Data store in variables are passes along with different flow.
3. Seamless data access & streaming – Mule 4 has fewer concepts and steps. Now every steps and task of java language knowledge is optional.Mule 4 is not only leveraging DataWeave as a transformation language, but expression language as well. For example in Mule 3 XML/CSV data need to be converted into java object to parse or reroute them. Mule 4 gives the ability to parse or reroute through Dataweave expression without converting into java. These steps simplify your implementation without using java.
Mule 4 Data Access
4. Dataweave 2.0 — Mule 4 introduces DataWeave as the default
expression language replacing Mule Expression Language (MEL) with a scripting
and transformation engine. It is combined with the built-in streaming
capabilities; this change simplifies many common tasks. Mule 4
simplifies data iteration. DataWeave knows how to iterate a json array. You
don’t even need to specify it is json. No need to use <json:json-to-object-transformer /> to convert data into java object.
Mule 4 vs Mule 3 flow comparison
Here are few points about Dataweave 2.0
Simpler syntax to learn
Human readable descriptions of all data types
Applies complex routing/filter rules.
Easy access to payload data without the need for
transformation.
Performs any kind of data transformation,
normalization, grouping, joins, pivoting and filtering.
5. Repeatable
Streaming – Mule 4 introduces
repeatable streams as its default framework for handling streams. To understand
the changes introduced in Mule 4, it is necessary to understand how Mule3 data
streams are consumed
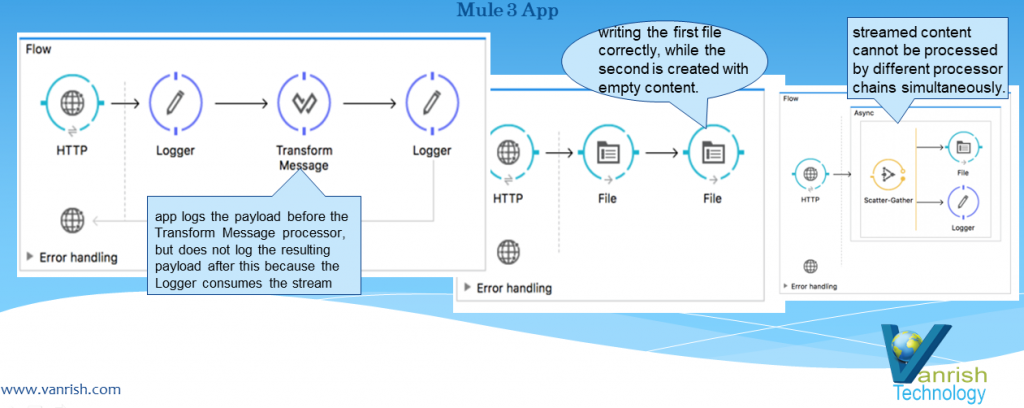
Mule 3 data streaming examples
In above three different Mule 3 flows, once stream data is
consumed by one node it is empty stream for 2nd node. So in the above
first example, in order to log the stream payload , the logger has to consume
the entire stream of data from HTTP connector. This means that the full content
will be loaded into memory. So if the content is too big and you’re loading
into memory, there is a good chance the application might run out of memory.
So Mule 4 repeatable streams enable you to
Read a stream more than once
Have concurrent access to the stream.
Random Access
Streams of bytes or streams of objects
As a component consumes the stream, Mule saves its content
into a temporary buffer. The runtime then feeds the component from the
temporary buffer, ensuring that each component receives the full stream,
regardless of how much of the stream was already consumed by any prior
component
Here are few points, how repeatable streams works in Mule 4
Payload
is read into memory as it is consumed
If
payload stream buffer size is > 512K (default) then it will be persisted to
disk.
Payload
stream buffer size can be increased or decreased by configuration to optimize
performance
Any
stream can be read at any random position, by any random thread concurrently
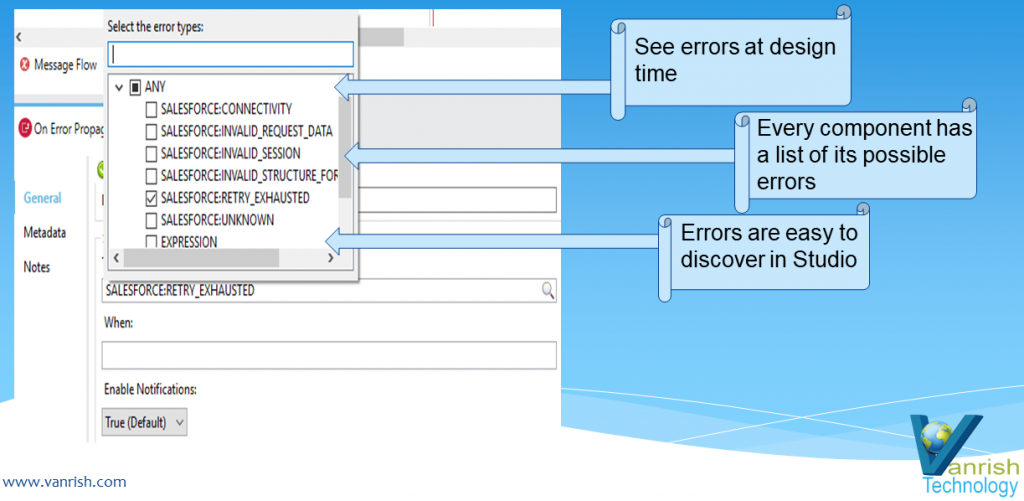
6. Error Handling — In Mule 4 error handling has been changed
significantly. Now In mule 4 you can discover errors at design time with visual
interface. You no need to deal with java exception directly and it is easy to
discover error while you are building flow. Every flow listed all possible
exception which potential arises during execution.
Mule 4 Error Handling
Now errors that occur
in Mule fall into two categories
Messaging errors
System errors
Messaging errors — Mule throws a messaging error (a Mule error) whenever a problem occurs within a flow. To handle Mule
errors, you can set up On Error components inside the scope-like Error Handler
component. By default, any unhandled errors are logged and propagated.
System errors — Mule throws a system error when an exception occurs
at the system level . If no Mule Event is involved, the errors are handled by a
system error handler.
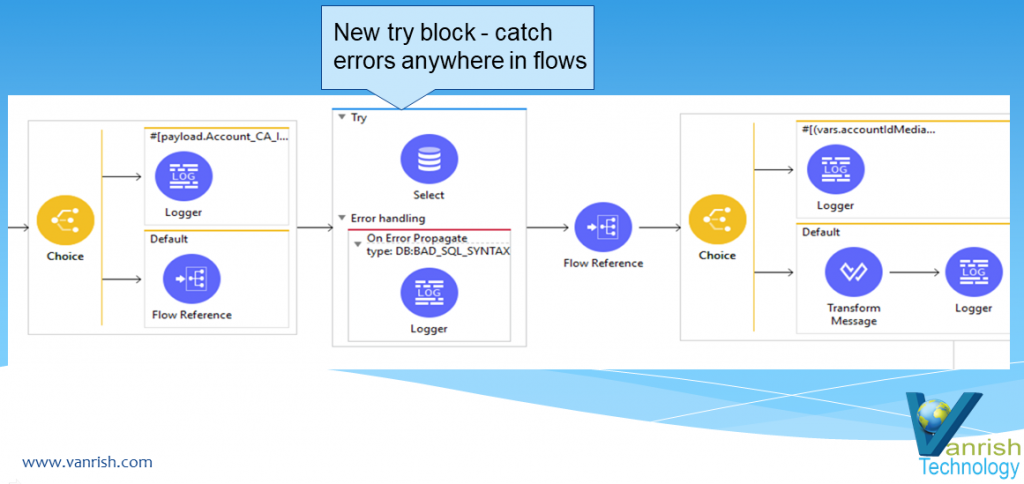
Try catch Scope — Mule 4 introduces a new try scope that you can use within a flow to do error handling of just inner components/connectors. This try scope also supports transactions and in this way it is replacing Old Mule 3 transaction scope.
Mule 4 A new try catch block
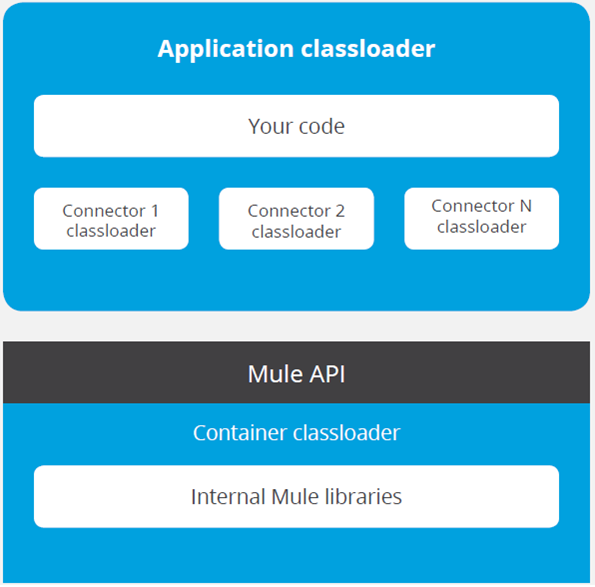
7. Class Loader Isolation — Class loader separates application completely from
Mule runtime and connector runtime. So, library file changes (jar version) do
not affect your application. This also
gives flexibility to your application to run any Spring version without worry
about Mulesoft spring version. Connectors are distributed outside the runtime
as well, making it possible to get connector enhancements and fixes without
having to upgrade the runtime or vice versa
In above pic showing that every component in any application have their own class loader and running independently on own class loader.
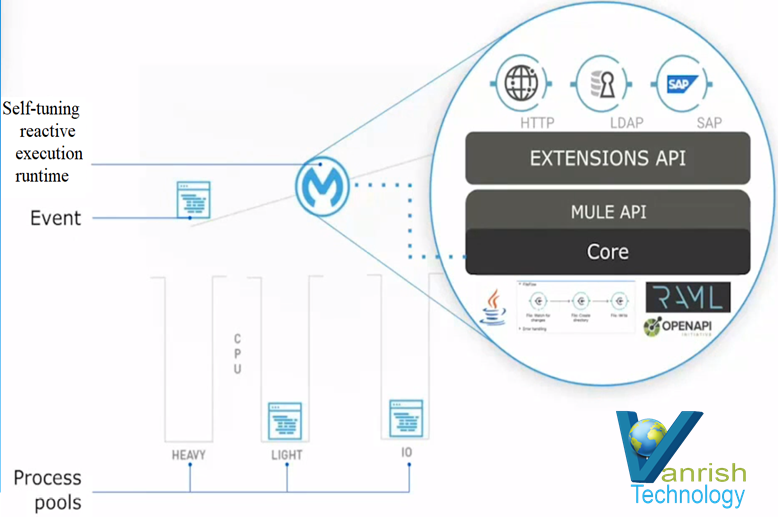
8. Runtime Engine — Mule 4 engine is new reactive and non-blocking engine. In Mule 4 non-blocking flow always on, so no processing strategy in flow. One best feature of Mule 4 engine is, It is self-tuning runtime engine. So what does this mean? If Mule 4 engine is processing your applications on 3 different thread pools, So runtime knows which application should be executed by each thread pool. So operation put in corresponding thread pool based on high intensive CPU processing or light intensive CPU processing or I/O operation. Then 3 pools are dynamic resizing automatically to execute application through self-tuning.
Mule 4 : Self tuning run time engine
So now self-tuning creates custom thread pools based on specific tasks. Mule 4 engine makes it possible to achieve optimal performance without having to do manual tuning steps.
Conclusion
Overall Mule 4 is
trying to make application development easy, fast and robust. There are more features
included in Mule 4 which I will try to cover in my next blog. I will also try
to cover more in depth info in above topic of Mule 4. Please keep tuning for my
next blog.
Rajnish Kumar is CTO of Vanrish Technology with Over 25 years experience in different industries and technology. He is very passionate about innovation and latest technology like APIs, IOT (Internet Of Things), Artificial Intelligence (AI) ecosystem and Cybersecurity. He present his idea in different platforms and help customer to their digital transformation journey.