APIs for IOT and FOG computing

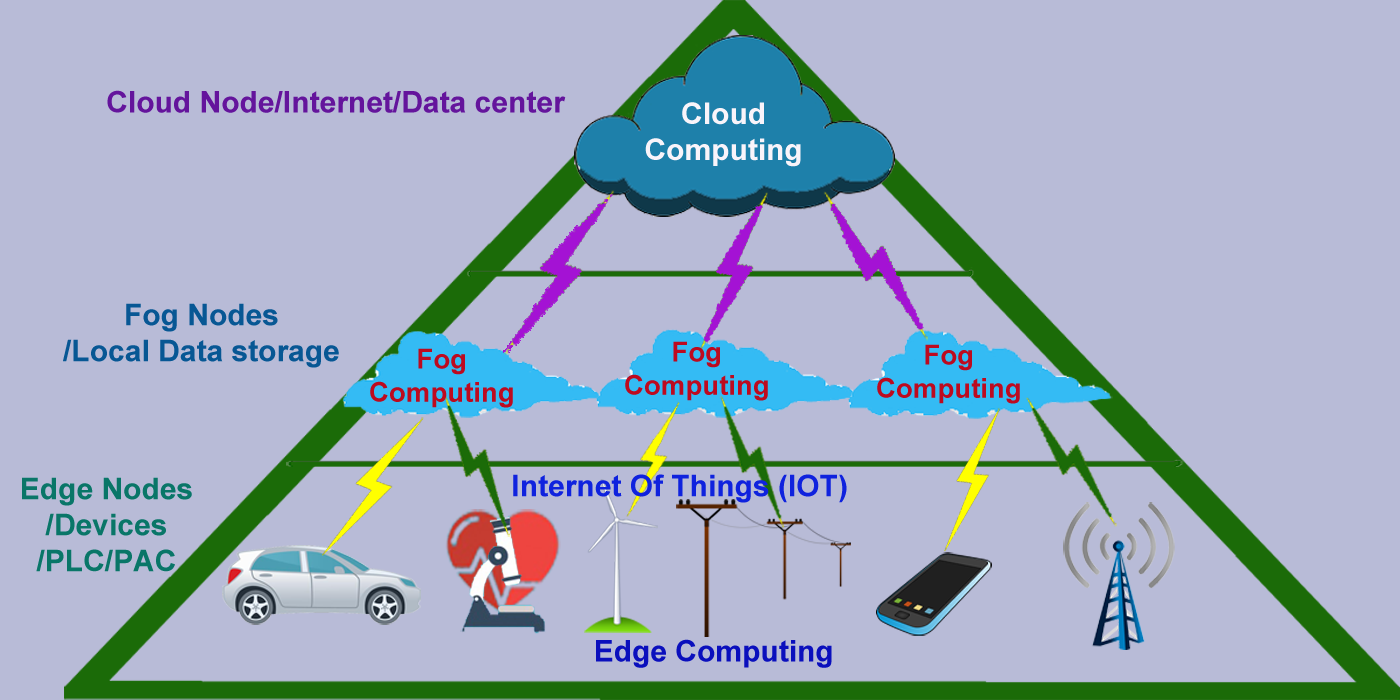
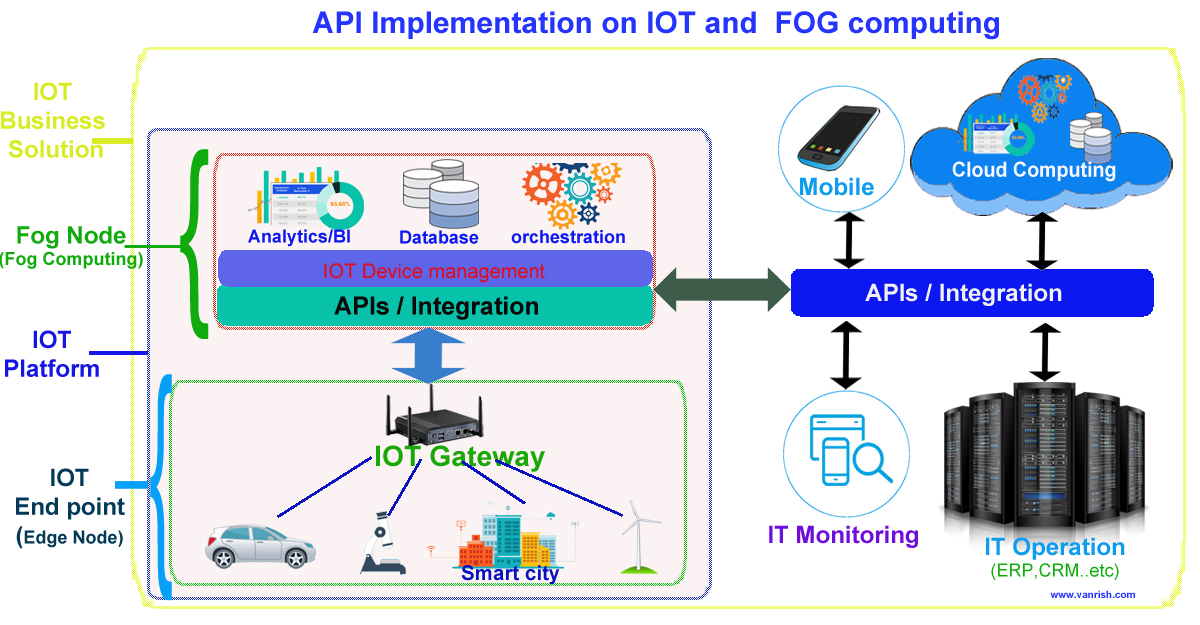
IOT (Internet Of Things) is transforming whole business and bringing new revolution in all kinds of business. These IOT devices generating terabytes of data. To handle unprecedented volume, variety and velocity of data, IOT needs new kind of infrastructure to support whole IOT eco system. FOG computing is a part of IOT eco system to support large volume of data with quick response. I explained in my previous blog, how FOG computing is now becoming major role in IOT devices. FOG is intermediate platform to collaborate between Cloud computing and Edge computing(IOT) to transfer data. Fog can hold small number of data and less computing power. Large data is stored in cloud and heavy computing is done in Cloud.

API (Application Programming Interface) have major role to transfer data from edge device (IOT) to Fog node and from fog node to Cloud (Internet). API is helping to collaborate between edge device to Fog node and Fog node to Cloud. API is playing major role to maintain volume, variety and velocity of data in IOT infrastructure.

API works on HTTP/HTTPS protocol. APIs are light weight and simple. Enabling APIs take very small amount of resource. So, API can enable in small system and consume without losing too much resources.  This API property helps to transfer data from Edge device(IOT) to Fog node and from Fog node to Cloud. API is not part of mechanical role. API is responsible for the optimization of data transfer. Proper enabling of APIs between these nodes increase the efficiency and computational power to all IOT devices. Fog node is intermediate node between IOT device and cloud. So, Fog node will be responsible to receive data from edge(IOT) device and transfer these data to Cloud. Communication between Edge(IOT) device to Fog node is very frequent. Data provided by API is responsible for all intermediate and quick computation on FOG node.

Cloud is still big stake holder for holding all data and large computation from IOT device.  API is providing data to cloud from FOG node in certain interval for heavy computation. As Edge(IOT) system getting more complex Fog computation responsibility will increase and API will come on picture to provide more data to Fog and from fog node to cloud.

API Integration of IOT with Fog and Cloud computing.

These are few benefits by enabling APIs for IOT devices and Fog Nodes

  • API provides flexibility to connect any IOT device to FOG node and FOG node to cloud network.
  • API provides seamless connectivity between these systems.
  • API brings whole IOT system in one seamless environment So, it is very easy to debug these systems.
  • API is very easy to develop and deploy so it’s easy to maintain these systems.
  • Provisioning of IOT device has also become very easy by enabling API.
  • According to Gartner study, Security of IOT is one of big concern. API provides whole one seamless system and network to mitigate this risk.

Fog Computing and Edge computing

IOT, Connect car, Automated car getting lot of traction in current word. All big companies want to be part of this process. All kind of sensors are installed in these vehicles. These sensors generate Terabytes of data and computing these data to run vehicle smoothly. Connected car or IOT based devices are completely based on computing power and quick response.

Sending data and computing these data in cloud could be catastrophic. Any network latency and processing delay might end with bad result. For example, your automated car is traversing through busy street. Suddenly a person comes in front of automated car. In this scenario, any network latency, slowness of computation and analysis effects the decision and subsequent action (Apply brake on car).

In IOT based device, any computing near to IOT device can reduce this risk. So how can we make this happen, if your all computing power are in cloud and data is in cloud.

Fog Computing & Edge computing

FOG Computing–In context of IOT, if intelligence pushes d down to the local area network (LAN) and compute these data in IOT gateway or FOG node will reduce network latency risk. Fogging or FogNetwork is decentralized computing and stores data in most logical and efficient place between IOT device and the cloud.

In FOG computing, data transported from IOT to Cloud need many steps.

  1. Signals from IOT is transported through wire to I/O point of device programmable automation controller(PLC). PLC execute control system program to automate system.
  2. Control system program sends data to protocol gateway, which convert this data into a protocol, understand internet systems such as MQTT or HTTP.
  3. At the end, data is send to fog node or IOT gateway on the LAN, which collects the data and preform analysis and computing on data. This even stores the data to transfer further to cloud network for later processing and intelligence.

Edge Computing — Edge computing refers to any computing infrastructure near to source of data (i.e. IOT device). So, Making IOT device smart and intelligent enough to take decision near to data gateway. The role of edge computing is to process data, store data in local device and transfer data to fog or cloud network. Above all processes are automated through PAC (Programmable automation controller) by executing board controlled system program. In edge computing, intelligence literally push to edge of network where our IOT device and outside network first connect to each other.

API: Hypermedia (HATEOAS)

When you start to build API there is always in your mind how can I make sure my all APIs are interlinked. How can a developer access these API without doing too much reengineering of your APIs?  How all API URL can easily and well document through current API?

HATEOAS, an abbreviation for Hypermedia as the Engine of Application State, is a constraint of the REST application architecture. API Hypermedia provides a placeholder in existing API framework, so that you can define and document all of methods related with existing API. A truly RESTful API is with hypertext.  By using hypermedia in responses we can offer links between existing endpoint and next possible API endpoints with documentation and corresponding actions. Defining hypermedia within your API leads  to standardize your API call and reduce duplicate effort.

There are two key things that make hypermedia APIs useful within APIs:

  • shared other APIs information so that developers can communicate with the API
  • Documenting and guiding developers so that they can take action along the way

You can define Hypermedia several ways in APIs. Here are few famous Hypermedias available.

1. Hypertext Application Language (HAL) -HAL is an open specification describing a generic structure for RESTful resources. HAL provides its linking capability with a convention which says that a resource object has a reserved property called “_links”. HAL supports JSON and XML.

"_links": {
    "self": {
            "href": "https://api.vanrish.com/api/user/matthew"
     }
},
"id": "matthew",
"name": "Matthew Walter"

2. Collection+JSON – Collection+JSON is a JSON-based read/write hypermedia-type designed to support management and querying of simple collections. A typical Collection+JSON contain a set of links, list of items, a queries collection, and a template object. 

{ "collection" :
  {
    "version" : "1.0",
   "href" : "https://api.vanrish.com/user/friends/",
   "links" : [
        {"rel" : "feed", "href" : "https://api.vanrish.com/user/friends/rss"}
    ]
 }
}

3. JSON-LD — JSON-LD (JavaScript Object Notation for Linked Data ) is a lightweight Linked Data format based on JSON. JSON-LD is designed around the concept of a “context” to provide additional mappings from JSON to an Resource Description Framework(RDF) model. This linking is supported by JSON format.

{
  "@context": "https://vanrish.com/api/1.0/user.jsonld",
  "@id": "https://vanrish.com/api/1.0/matthew",
  "name": "Matthew Walter",
  "age": "40",
  "homepage": "https://www.vanrish.com/"
}

4. Siren— Siren is a hypermedia specification for representing entities, offering structures to communicate information about entities. An Entity is a URI-addressable resource that has properties and actions associated with it. It may contain sub-entities and navigational links. Siren supports JSON and XML format.

{
  "class": [ "order" ],
  "properties": {
       "orderNumber": 24,
       "itemCount": 3,
       "status": "pending"
   },
   "entities": [
       {
          "class": [ "items", "collection" ],
          "rel": [ "https://api.vanrish.com/rels/order-items" ],
          "href": "https://api.vanrish.com/orders/24/items"
       },
       {
          "class": [ "info", "customer" ],
          "rel": [ "https://api.vanrish.com/rels/customer" ],
          "properties": {
                "customerId": "5675433",
                "name": "Matthew Walter"
       },
       "links": [
            { "rel": [ "self" ], "href": "https://api.vanrish.com/customers/5675433" }
         ]
       }
    ],
    "links": [
        {"rel": [ "self" ], "href": "https://api.vanrish.com/orders/24" },
        { "rel": [ "previous" ], "href": "https://api.vanrish.com/orders/23" },
        { "rel": [ "next" ], "href": "https://api.vanrish.com/orders/25" }
     ]
}

5. JSON API — JSON API is a specification for how a client should request that resources be fetched or modified, and how a server should respond to those requests. Jason API ensures separation between client and server and also reducing the number of call without impacting discoverability. This is Json based and one of popular hypermedia for API.

{
  "type": "user",
  "id": "1",
  "attributes": {
  "title": "User Information"
   },
  "relationships": {
  "company": {
  "links": {
    "self": "https://api.vanrish.com/articles/1/relationships/user",
    "related": "https://api.vanrish.com/articles/1/user"
   },
   "data": { "type": "people", "id": "9" }
  }
 },
 "links": {
  "self": "https://api.vanrish.com/articles/1"
 }
}

These are few famous API hypermedia, developer are using to link their APIs and document. Along with all these hypermedia there are some more less popular hypermedia  like Uber, Mason, Cj, Yahapi, Paypal,OData and CPHL.

There are few draw back about using hypermedia within API.

  1. More data  transport through network for hypermedia.
  2. It makes complex to process and understand these links within APIs.

API Hypermedia is still not yet standardize. Most of these API hypermedias are still evolving and coming with new standard. This is one of the most active communities and developers are coming forward with their new API hypermedia concept.

Mulesoft: Twilio API Integration

mulesoft-logoplustwilio

Twilio is a cloud based communication company that enables users to use standard web languages to build voice, VoIP, and SMS apps via a web API. Twilio provides a simple hosted API and markup language for businesses to quickly build scalable, reliable and advanced voice and SMS communications applications. Twilio based telephony infrastructure enable web programmer to integrate real time phone call, SMS or VOIP to their application.

Mulesoft provides cloud connector to integrate Twilio Api within Mulesoft. Mulesoft Cloud connector provides a simple and easy way to integrate with these Twilio APIs, and then use them as services within Mulesoft. Mulesoft-Twilio connector provides a platform for developer to develop and integrate their application easily and quickly with Twilio.

Before start integration of Mulesoft with Twilio, create your Twilio account and get “ACCOUNT SID” and “AUTH TOKEN”.

twilio-account

Now download and install Twilio connector into Anypoint studio.

Anypoint Studio –>Help –>Install New Software

twilio-connector

Configure pom.xml to pull Twilio jar dependency in maven based project.

Add plugin in plugin section and dependency in pom.xml file. This section will also add into pom.xml file when Twilio connector drag into AnypointStudio canvas and use it into flow.

<plugin>
   <groupId>org.mule.tools.maven</groupId>
<artifactId>mule-app-maven-plugin</artifactId>
<version>${mule.tools.version}</version>
<extensions>true</extensions>
<configuration>
<copyToAppsDirectory>true</copyToAppsDirectory>
<inclusions>
<inclusion>
<groupId>org.mule.modules</groupId>
<artifactId>mule-module-apikit</artifactId>
</inclusion>
        <inclusion>
                   <groupId>org.mule.modules</groupId>
                   <artifactId>mule-module-twilio</artifactId>
         </inclusion>
     </inclusions>
</configuration>
</plugin>

Dependency tag

<dependency>
<groupId>org.mule.modules</groupId>
<artifactId>mule-module-twilio</artifactId>
<version>1.4</version>
</dependency>

Now configure Twilio Global Elements to connect your application with Twilio into Mule-config.xml file

<twilio:config name="Twilio" accountSid="${TwilioSID}" authToken="${TwilioAuthToken}" doc:name="Twilio">
<twilio:http-callback-config />
</twilio:config>

In above code TwilioSID and TwilioAuthToken are coming from Twilio account.

Mulesoft Twilio connector provides a  number of methods to integrate with your application. Below image show some of methods expose by Mulesoft-Twilio connector.

twilio-method

I am using “send SMS message” method form Mulesoft-Twilio connector for my example.

Now you can integrate Twilio to send SMS with your application. Here is example code.

<logger message="#[payload.recipientPhoneNumber]" level="INFO" doc:name="Logger"/>
<twilio:send-sms-message config-ref="Twilio" accountSid="${TwilioSID}" body="Hello World Sending SMS from Twilio" from="+15555555555" to="#[payload.recipientPhoneNumber]" doc:name="Twilio"/>

Twilio API does not support bulk SMS for recipient. So, to initiate messages to a list of recipients, you must make a request for each number to which you would like to send a message. The best way to do this is to build an array of the recipients and iterate through each phone number.

Here is small flow for Twilio integration.

twilio-flow

Code for this flow.

<?xml version="1.0" encoding="UTF-8"?>
<mule xmlns:twilio="https://www.mulesoft.org/schema/mule/twilio" xmlns:http="https://www.mulesoft.org/schema/mule/http" xmlns="https://www.mulesoft.org/schema/mule/core" xmlns:doc="https://www.mulesoft.org/schema/mule/documentation"
xmlns:spring="https://www.springframework.org/schema/beans"
xmlns:xsi="https://www.w3.org/2001/XMLSchema-instance"
xsi:schemaLocation="https://www.springframework.org/schema/beans https://www.springframework.org/schema/beans/spring-beans-current.xsd
https://www.mulesoft.org/schema/mule/core https://www.mulesoft.org/schema/mule/core/current/mule.xsd
https://www.mulesoft.org/schema/mule/http https://www.mulesoft.org/schema/mule/http/current/mule-http.xsd
https://www.mulesoft.org/schema/mule/twilio https://www.mulesoft.org/schema/mule/twilio/current/mule-twilio.xsd">

<http:listener-config name="HTTP_Listener_Configuration" host="0.0.0.0" port="8081" doc:name="HTTP Listener Configuration"/>
<twilio:config name="Twilio" accountSid="${TwilioSID}" authToken="${TwilioAuthToken}" doc:name="Twilio">
    <twilio:http-callback-config />
</twilio:config>
  <flow name="twilio-mulesoftFlow">
     <http:listener config-ref="HTTP_Listener_Configuration" path="/twilio" doc:name="HTTP"/>
     <set-payload value="" doc:name="Set Payload"/>
     <logger message="#[payload.recipientPhoneNumber]" level="INFO" doc:name="Logger"/>
     <twilio:send-sms-message config-ref="Twilio" acc#[payload.recipientPhoneNumber]: #339966;">${TwilioSID}" body="#[payload]" from="+15555555555" to="+12222222222" doc:name="Twilio"/>
  </flow>
</mule>

If you are getting exception, make sure twilio-mulesoft jar is in classpath and properly configured.

RAML:Schema Validation for APIs

Initially when REST was introduced there was always challenge to validate your request against prerequisite requirement. This was available in SOAP web services as XSD schema validation but it was not available in REST webservice. Architect and developer had to face the challeng to implement some kind of schema to validate their request.

YAML based RAML (Restful API modeling Language) was introduced in 2013. RAML gives flexibility to define schema to validation request/response. This breakthrough helps Architect and developer to define schema for REST API to validate request/response.

RAML schema validation can be defined in two formats.
1) XSD Based
2) Json Based.

Schema validation can be defined in two ways inside RAML
1) Inline schema definition
2) XSD or json schema definition file.

Schema definition can be defined in schema tag within RAML file.
“!Include” tag uses to include schema file for file based schema definition within RAML.
Json based schema definition

/car:
  post:
    description: Getting car info from Car Application
    body:
      application/json:
        schema: !include schemas/cars-schema-request.json 

XSD based schema definition

responses: 
      200:
        body:
          application/xml: 
              schema: !include schemas/vanrish-car-response.xsd

Inline definition of schema

/car:
  post:
    description: Getting car info from Car Application
    body:
      application/json:
        schema: |
	     {
             "type": "object",
             "$schema": "http://json-schema.org/draft-03/schema",
             "required": true,
             "properties": {              
              "vin": {
                  "type": "string",
                  "required": true
              },
              "model": {
                  "type": "string",
                  "required": true
              },
              "make": {
                  "type": "string",
                  "required": true              
              }
            }
          } 

Here are few tips to use json based schema validation.

1) If request/response is object based then in schema it is defined as type:Object .

"$schema": "http://json-schema.org/draft-03/schema",
"type": "object"

2) If request/response is list based then it is defined as

"$schema": "http://json-schema.org/draft-03/schema",
"type": "array",
"items": {

3) If request/response is list and it contain object, it is defined as

"items": {
  "type": "object",
  "properties": {
    "vin": {
      "type": "string"
}

4) Type of field for Object can be defined as string,integer, or boolean

"vin": {
  "type": "integer"
}

5) Field can be restricted for known value with defining enum

"isCdl": {
  "description": "State",
  "type": "string",
  "enum": [ "true", "false" ]
}

6) Field can be made mandatory by introducing required field

"name": {
  "type": "string",
  "required": true
}

7) Any field can be validated against regular expression by defining regex code

"deviceName": {
  "type": "string",
  "pattern": "^/dev/[^/]+(/[^/]+)*$"
}

8) Maximum and minimum field length can be validated with defining maxLength and minLength field

"id": {
  "description": "A three-letter id",
  "type": "string",
  "maxLength": 3,
  "minLength": 3
}

9) Reuse of validation by importing validated schema from different file system by defining like that

"credentials": { "$ref": "app-credential.json#/definitions/credential" }

10) anyOf, allOf, oneOf, not- these four keywords intend to bring logical processing primitives to Schema validation

{
  "anyOf": [
   { "type": [ "string", "boolean" ] },
   { "schema1": "#/definitions/nfs" },
   { "schema2": "#/definitions/pfs" }
 ]
}

Mulesoft Connector Devkit : Coding & Deployment

In my previous blog I explained configuration and setup for Mulesoft connector Devkit. In this blog I am going to explain how to write and deploy your connector. As I mentioned in my previous blog Devkit is a platform to develop Mulesoft connector. Devkit is very powerful tool to develop extreme complex connector or simple connector.

Here are few steps to develop Mulesoft connector.

1) Create project from anypoint studio

connector-project-create

2) Select SDK Based connector. This selection supports standalone java as well as REST based API. Once you select this selection below window will come. Name your connector project, select working directory and  then click next

connector-project-create-box

3)  Now next step you need to select maven Group Id and Artifact Id and click next.

4) Next step you need to select icon and logo for your connector then click finish.
connector-project-icon-select

After clicking finish connector project will generate.

Two java files are generated in your connector project. Here my project name is Vanrish, so it generated VanrishConnector.java and ConnectorConfig.java.

Generated VanrishConnector.java 


@Connector(name="vanrish", friendlyName="Vanrish")

public class VanrishConnector {
 
@Config
ConnectorConfig config;
 

In this code snippet annotation defines your connector name and display name. In above annotation “name” is for connector name and “friendlyName” will display connector name once you install this connector in Anypoint studio. This annotated class is main class for creating connector

In 2nd line we are initiating config class to add all configuration related with this connector.

If you are adding any method to execute this connector you need to define your method with  @Processor annotated method.


@Processor
public String getVehicleInfo(String deviceId) throws Exception {
return "Hello World"+deviceId;
}

Here is Full code snippet for this class


package org.mule.modules.vanrish;

import org.mule.api.annotations.Config;
import org.mule.api.annotations.Connector;
import org.mule.api.annotations.Processor;
import org.mule.api.annotations.lifecycle.Start;
import org.mule.api.annotations.oauth.OAuthProtected;
import org.mule.modules.vanrish.config.ConnectorConfig;

@Connector(name = "vanrish", friendlyName = "Vanrish")
public class VanrishConnector {

 @Config
 ConnectorConfig config;

 @Start
 public void init() {
 }

 public ConnectorConfig getConfig() {
  return config;
 }

 public void setConfig(ConnectorConfig config) {
  this.config = config;
 }

 @Processor
 public String getVehicleInfo(String deviceId) throws Exception {
  return "Hello World" + deviceId;
 }
}

Now in 2nd class we define connector configuration. This class is annotated with @Configuration

In this class I defined couple of methods to access external REST api for this connector.

I define apiURL and their version to use inside my annotated method


@Configurable
@Optional
@Default("https://platform.vanrish.com/api")
private String apiUrl;

@Configurable
@Optional
@Default("v1")
private String apiVersion;

Here are annotation definition for connector
@Configurable — Allow to configure this field
@Optional —This field is not mandatory
@Default —This is providing default value for field

Here is full code snippet


package org.mule.modules.vanrish.config;

import org.mule.api.annotations.components.Configuration;
import org.mule.api.annotations.Configurable;
import org.mule.api.annotations.param.Default;
import org.mule.api.annotations.param.Optional;

@Configuration(friendlyName = "Configuration")
public class ConnectorConfig {

/**

* Vanrish API Url

*/

 @Configurable
 @Optional
 @Default("https://platform.vanrish.com/api")
 private String apiUrl;

 @Configurable
 @Optional
 @Default("v1")
 private String apiVersion;

 public String getApiUrl() {
  return apiUrl;
 }

 public void setApiUrl(String apiUrl) {
  this.apiUrl = apiUrl;
 }

 public String getApiVersion() {
  return apiVersion;
 }

 public void setApiVersion(String apiVersion) {
  this.apiVersion = apiVersion;
 }
}

In advance connector writing you can create client java class and use above apiURL and version to access api method and execute to get result.

Now to build this project in Anypoint studio, you need to select project and right click. This action will pop up option window. Here in this window you need to select Anypoint Connector then click Build connector.

Steps —  Right Click on project –>Anypoint Connector –> Build Connector
Here it is shown in the picture below
connector-project-build

This action will build your connector.

Follow the same steps to install your connector into Anypoint studio.
Steps — Right Click on project –> Anypoint Connector –> Install or Update
This action will install your connector into Anypoint studio.

After installing your connector,you can search your connector name into Anypoint studio.

vanrish-connector

Connector Testing
you can create small flow in Anypoint studio and test your connecotor.

Here is example to test my connector
vanrish-connector-flow

Mulesoft Connector Devkit Setup

Mulesoft connector is the backbone of mulesoft flow. It receives or sends messages between Mule and one or more external sources, such as files, databases, or Web services. It also acts as message sources by working as inbound endpoints, they can act as a message processor that performs an operation in middle of a flow, or they can fall at the end of a flow and act as the recipient of the final payload data.

Mulesoft connectors are either endpoint-based or operation-based. Endpoint-based follow one-way or request-response exchange patterns. Operation-based connectors are based on information exchange pattern.

There are number of connector available in anypoint studio but some time the connector available is not able to satisfy company specific requirement. Own connector is a good option to explore whether we need a connector with a specific functionality or want to connect to a system without a pre-built connector.

If you are building your own connector you need to setup your development environment inside your mulesoft anypoint studio.

Make sure you enable maven configuration inside your anypoint studio and install Devkit for Mulesoft connector
1. Installation and Configuration of Maven 
Steps to enable Maven setting inside Anypoint studio.

a) Studio –>Help –> Install New Software

newsoftware

b)  In Available Software window

Work with –>Anypoint Addons Update Site

anypoint_workwith

c) Now you need to select Maven Tools for Mule

anypoint_maven

d)   Click Next button and Then Finish.

This will install maven plugin into your Anypoint studio

Validate your maven plugin installation

Got to Window –> Preferences
you can find maven link under Anypoint Studio tab

configure maven in your Anypoint studio

set maven installation directory and enter your maven command

anypoint_maven_prefrences

Click Test Maven configuration. You will get green check. Now you all set for maven configuration

2.   Installation of Anypoint Devkit Plugin
Steps to get Anypoint  DevKit Plugin

a)  Studio –>Help –>Install New Software

b)  In Available Software window Please select Anypoint DevKit Update site

anypoint_devkit_site

c) Now you need to select Anypoint Devkit Plugin

anypoint_devkit_site_select

d)  Click Next button and Then Finsh.

This will install Anypoint Devkit Plugin into your Anypoint studio

Validate your Devkit plugin installation

Go to  File — New in Anypoint studio

You will find two new options for Anypoint Connector

a) Anypoint Connector Project

b)Anypoint Connector Component

anypoint_devkit_install

Now you all set to develop your own connector.

In my next blog I will write how to build and deploy your own connector.


DataWeave:A New Era in Mulesoft

Dataweave is a new data mapping tool which comes with MuleSoft 3.7 run time. Before Mule 3.7 runtime, Datamapper was there for data mapping. Dataweave inherit some of the functionality from Datamapper but due to restriction of complex mapping in Datamapper, Dataweave emerged with Mulsesoft 3.7 runtime.
There are three section of Dataweave.
1) Input
2) Output
3) Data transformation language

Data transformation language is based on JSON like language. If you are familiar with JSON, it is very easy to write Dataweave transformation logic and maintain this logic.

Here are some tips to write and maintain Dataweave transformation logic.

1)   Default Output of Dataweave Transformation is set into payload. But you can easily     change from dropdown and set this output as variable or session variable
dataweave

2) Output of transformed data you can easily define in Dataweave. If you are transforming data into XML you just need to define as “ %output application/xml” without touching underline transformation logic. Same way if you are transforming your data into json or any other format you just need to define output like without touching underline transformation logic as “ %output application/json”, “ %output application/java”, “ %output application/csv”..

%dw 1.0
%output application/xml
%namespace ns0 http://schemas.vanrish.com/2010/01/ldaa

3)  Dataweave transformation logic gives leverage to skip any null field during data transformation. This is only declarative. Here is declaration to skipping null fields everywhere during transformation skipNullOn=”everywhere”

%dw 1.0
%output application/xml skipNullOn=”everywhere”
%namespace ns0 http://schemas.vanrish.com/2010/01/ldaa


4)  Dataweave transformation allows to access flowVars and sessionVars directly into transformation field.

orderParameter:{
         name:“MINOR_LI_ID”,
         value:flowVars.payloadVar.minorLiId
}

5)  Dataweave transformation reads properties value directly from properties file. You can access properties value in Dataweave like you are accessing during flow.

teamName:“$($.teameName)${teamNameSuffice},
  teamNameSuffice is defined in properties file.

6)  Dataweave transformation allows implementing condition logic for each field. It is very easy to implement and transform your data based on these condition logic. Here is example to implement to condition logic for field partnershipType.

partnershipType:“NEW” when $.partnership-type==”NEW”
                            otherwise “USED” when $.partnership-type==”USED”
                            otherwise “EM” when $.partnership-type==”EM”
                            otherwise “PU” when $.partnership-type==”PU”
                            otherwise “PN” when $.partnership-type==”PN”
                            otherwise $.partnership-type,
Here is another example

creativeType:“GRAPHIC” when ($.creative-type == “GRAPHIC” or $.creative-type == null)
                         otherwise “TEMPLATED_AD” when $.creative-type == “TEMP_AD”
                         otherwise “AD_TAG” when $.creative-type == “AD_TAG”
                         otherwise “”,

7)  During Dataweave transformation logic you can call global function and transform your field based on these function output. This is one of the ways you can call java object into Dataweave transformation.

Here is example
global-functions is tag for mule-config file where you can define function for entire mule flow

<global-functions>

def toUUID() {
return java.util.UUID.randomUUID().toString()
}

def getImageType(imageName) {
return imageName.substring(imageName.lastIndexOf(‘.’)+1)
}

</global-functions>

Now you can call this function inside Dataweave transformation logic.

 imageType:getImageType($.origin-name as :string) when $.origin-name != null otherwise “”,

Mulesoft:Flow Execution Time

Mulesoft application is based on flows. Every flow has their own execution time. We can calculate this flow execution is couple of ways. But Mulesoft provides one of the easy way to calculate this flow execution time by using interceptor . Timer interceptor (<timer-interceptor/>) is one of the mule interceptor to calculate Mulesoft flow execution time.

Here is flow diagram for timer-interceptor

muleTimerInterceptorFlow

Here is code for timer-interceptor to implement in your application


<?xml version="1.0" encoding="UTF-8"?>
<mule xmlns:http="http://www.mulesoft.org/schema/mule/http" xmlns="http://www.mulesoft.org/schema/mule/core" xmlns:doc="http://www.mulesoft.org/schema/mule/documentation"       xmlns:spring="http://www.springframework.org/schema/beans"       xmlns:xsi="http://www.w3.org/2001/XMLSchema-instance"       xsi:schemaLocation="http://www.springframework.org/schema/beans http://www.springframework.org/schema/beans/spring-beans-current.xsdhttp://www.mulesoft.org/schema/mule/core http://www.mulesoft.org/schema/mule/core/current/mule.xsd
http://www.mulesoft.org/schema/mule/http http://www.mulesoft.org/schema/mule/http/current/mule-http.xsd">

<http:listener-config name="HTTP_Listener_Configuration" host="0.0.0.0" port="8081" basePath="/demo" doc:name="HTTP Listener Configuration"/>

<flow name="muleTimerInterceptorFlow">
<http:listener config-ref="HTTP_Listener_Configuration" path="/" doc:name="HTTP"/>               <timer-interceptor/>
     <set-payload doc:name="Set Payload" value="Hello World"/>
<logger message="#[payload]" level="INFO" doc:name="Logger"/>
</flow>
</mule>

 <timer-interceptor/> tag display time in milliseconds.

You can customize flow execution time to replace <timer-interceptor/>  with  <custom-interceptor>.
In this custom interceptor you need to mention your custom interceptor java class.

<custom-interceptor class=”com.vanrish.interceptor.TimerInterceptor” />

Here is flow diagram for custom timer-interceptor

muleTimerCustomInterceptorFlow

Here is mule-config.xml  code for custom timer-interceptor


<?xml version="1.0" encoding="UTF-8"?>
<mule xmlns:http="http://www.mulesoft.org/schema/mule/http" xmlns="http://www.mulesoft.org/schema/mule/core" xmlns:doc="http://www.mulesoft.org/schema/mule/documentation"       xmlns:spring="http://www.springframework.org/schema/beans"       xmlns:xsi="http://www.w3.org/2001/XMLSchema-instance"       xsi:schemaLocation="http://www.springframework.org/schema/beans http://www.springframework.org/schema/beans/spring-beans-current.xsd
http://www.mulesoft.org/schema/mule/core http://www.mulesoft.org/schema/mule/core/current/mule.xsd
http://www.mulesoft.org/schema/mule/http http://www.mulesoft.org/schema/mule/http/current/mule-http.xsd">

<http:listener-config name="HTTP_Listener_Configuration" host="0.0.0.0" port="8081" basePath="/demo" doc:name="HTTP Listener Configuration"/>

<flow name="muleTimerInterceptorFlow">

<http:listener config-ref="HTTP_Listener_Configuration" path="/" doc:name="HTTP"/>

 <custom-interceptor class="com.vanrish.interceptor.TimerInterceptor" />

<set-payload doc:name="Set Payload" value="Hello World"/>
<logger message="#[payload]" level="INFO" doc:name="Logger"/>
</flow>
</mule>

Java TimerInterceptor  code for custom timer-interceptor tag


package com.vanrish.interceptor;


import java.text.DateFormat;
import java.text.SimpleDateFormat;
import java.util.Date;
import org.mule.api.MuleEvent;
import org.mule.api.MuleException;
import org.mule.api.interceptor.Interceptor;
import org.mule.processor.AbstractInterceptingMessageProcessor;
import org.apache.commons.logging.Log;
import org.apache.commons.logging.LogFactory;

/**
* <code>TimerInterceptor</code> simply times and displays the time taken to
* process an event.

*/

public class TimerInterceptor extends AbstractInterceptingMessageProcessor

implements Interceptor {

/**

* logger used by this class

*/

private static Log logger = LogFactory.getLog(TimerInterceptor.class);

public MuleEvent process(MuleEvent event) throws MuleException {
long startTime = System.currentTimeMillis();
DateFormat dateFormat = new SimpleDateFormat("yyyy/MM/dd HH:mm:ss");
Date stdate = new Date();
String start = dateFormat.format(stdate);
System.out.println(start);

MuleEvent resultEvent = processNext(event);

Date enddate = new Date();
String end = dateFormat.format(enddate);

if (logger.isInfoEnabled()) {

long executionTime = System.currentTimeMillis() - startTime;
            logger.info("Custom Timer : "+resultEvent.getFlowConstruct().getName() + " Start at "+start+" and end at "+end +" it took " + executionTime + "ms to process event ["                   + resultEvent.getId() + "]");
}
return resultEvent;
}
}

Mulesoft Polling : A New Perspective

Mulesoft polling is one of the most important features in Mulesoft. If you are dealing with large set of data or asynchronous workflow, polling architect is one of the best options to manage this scenario.
There are two options to configure Mulesoft poll scheduling.

  1. Fixed frequency scheduler – you can define polling time in frequency, start delay and time unit. This is one of the simplest ways to define your polling.
  2. Cron scheduler – Cron scheduler gives ability to use expression language and manage complex scheduling polling.

There is no relationship between two polling. This was challenge for me to get the relationship between two polling so that I can manage my data more efficiently.

Mulesoft gives couple of options to set up relationship between two polls.

Watermark – In polling there is always challenge to process newly created data and keep persist pointer for processed data to avoid duplicate processing. Mulesoft allows us as Watermark to persist this pointer in objectstore. Mule sets a watermark to a default value the first time the flow runs, then uses it as necessary when running a query or making an outbound request. Based on flow Mule may update the original value of the watermark or maintain the original value.
Here is simple flow to show how to implement watermark for poll

Poll Watermark Flow Diagram
poll-watermark

Here is code for this flow


<?xml version="1.0" encoding="UTF-8"?>
  <mule xmlns:schedulers="http://www.mulesoft.org/schema/mule/schedulers" xmlns:tracking="http://www.mulesoft.org/schema/mule/ee/tracking"
   xmlns:http="http://www.mulesoft.org/schema/mule/http" xmlns:mulexml="http://www.mulesoft.org/schema/mule/xml" xmlns="http://www.mulesoft.org/schema/mule/core" xmlns:doc="http://www.mulesoft.org/schema/mule/documentation"
   xmlns:spring="http://www.springframework.org/schema/beans"
   xmlns:xsi="http://www.w3.org/2001/XMLSchema-instance"
   xsi:schemaLocation="http://www.mulesoft.org/schema/mule/db http://www.mulesoft.org/schema/mule/db/current/mule-db.xsd
   http://www.springframework.org/schema/beans http://www.springframework.org/schema/beans/spring-beans-current.xsd
   http://www.mulesoft.org/schema/mule/core http://www.mulesoft.org/schema/mule/core/current/mule.xsd
   http://www.mulesoft.org/schema/mule/http http://www.mulesoft.org/schema/mule/http/current/mule-http.xsd
   http://www.mulesoft.org/schema/mule/xml http://www.mulesoft.org/schema/mule/xml/current/mule-xml.xsd
   http://www.mulesoft.org/schema/mule/ee/tracking http://www.mulesoft.org/schema/mule/ee/tracking/current/mule-tracking-ee.xsd
   http://www.mulesoft.org/schema/mule/schedulers http://www.mulesoft.org/schema/mule/schedulers/current/mule-schedulers.xsd">
  <spring:beans>
     <spring:bean id="dataSourceBean" name="dataSource_Bean" class="org.apache.commons.dbcp.BasicDataSource">
       <spring:property name="driverClassName" value="com.microsoft.sqlserver.jdbc.SQLServerDriver"/>
       <spring:property name="username" value="********"/>
       <spring:property name="password" value="********* "/>
       <spring:property name="url" value="jdbc:jtds:sqlserver://localhost:60520;Instance=CRM;DatabaseName=vanrish;domain=man;integrated security=false"/>
    </spring:bean>
 </spring:beans>
  <db:generic-config name="Generic_Database_Configuration" dataSource-ref="dataSourceBean" doc:name="Generic Database Configuration" >
     <reconnect-forever frequency="30000"/>
  </db:generic-config>
<flow name="poll-watermarking" processingStrategy="synchronous">
  <poll doc:name="Poll">
    <schedulers:cron-scheduler expression="0 22 12 * * ?"/>
    <watermark variable="serialNumber" default-expression="0" selector="LAST" selector-expression="#[payload.serialNumber]"/>
    <db:select config-ref="Generic_Database_Configuration" doc:name="Select Database">
       <db:dynamic-query><![CDATA[SELECT
MessageId, MessageType,SerialNumber,CreatedOn  FROM Message where SerialNumber  > #[Integer.parseInt(flowVars['serialNumber'])] order by SerialNumber asc]]></db:dynamic-query>
    </db:select>
 </poll>
   <logger message="#[flowVars['serialNumber']] == Hello this is Loggin Message == #[payload]" level="INFO" doc:name="Logger"/>
  </flow>
</mule>

Idempotent Filter – Idempotent filter is another way in Mule we can keep track between two polling. This filter ensures that only unique messages are received by a service by checking the unique ID of the incoming message. This filter also store unique id/pointer in objectstore in mule.
Here is simple flow to use Idempotent Filter

Poll Idempotent Filter flow Diagram
poll-idempotent

idempotent-objectStore

Here is code

<?xml version="1.0" encoding="UTF-8"?>
<mule xmlns:schedulers="http://www.mulesoft.org/schema/mule/schedulers" xmlns:tracking="http://www.mulesoft.org/schema/mule/ee/tracking" xmlns:db="http://www.mulesoft.org/schema/mule/db"
  xmlns:cassandradb="http://www.mulesoft.org/schema/mule/cassandradb" xmlns:http="http://www.mulesoft.org/schema/mule/http" xmlns:json="http://www.mulesoft.org/schema/mule/json" xmlns:mulexml="http://www.mulesoft.org/schema/mule/xml" xmlns="http://www.mulesoft.org/schema/mule/core" xmlns:doc="http://www.mulesoft.org/schema/mule/documentation"
  xmlns:spring="http://www.springframework.org/schema/beans"
  xmlns:xsi="http://www.w3.org/2001/XMLSchema-instance"
  xsi:schemaLocation="http://www.mulesoft.org/schema/mule/db http://www.mulesoft.org/schema/mule/db/current/mule-db.xsd
  http://www.springframework.org/schema/beans http://www.springframework.org/schema/beans/spring-beans-current.xsd
  http://www.mulesoft.org/schema/mule/core http://www.mulesoft.org/schema/mule/core/current/mule.xsd
  http://www.mulesoft.org/schema/mule/http http://www.mulesoft.org/schema/mule/http/current/mule-http.xsd
  http://www.mulesoft.org/schema/mule/xml http://www.mulesoft.org/schema/mule/xml/current/mule-xml.xsd
  http://www.mulesoft.org/schema/mule/ee/tracking http://www.mulesoft.org/schema/mule/ee/tracking/current/mule-tracking-ee.xsd
  http://www.mulesoft.org/schema/mule/schedulers http://www.mulesoft.org/schema/mule/schedulers/current/mule-schedulers.xsd">
    <spring:beans>
      <spring:bean id="dataSourceBean" name="dataSource_Bean" class="org.apache.commons.dbcp.BasicDataSource">
        <spring:property name="driverClassName" value="com.microsoft.sqlserver.jdbc.SQLServerDriver"/>
        <spring:property name="username" value="*******"/>
        <spring:property name="password" value="********"/>
        <spring:property name="url" value="jdbc:jtds:sqlserver://localhost:60520;Instance=CRM;DatabaseName=vanrish;domain=man;integrated security=false"/>
      </spring:bean>
    </spring:beans>
    <db:generic-config name="Generic_Database_Configuration" dataSource-ref="dataSourceBean" doc:name="Generic Database Configuration" >
      <reconnect-forever frequency="30000"/>
    </db:generic-config>
    <flow name="poll-idempotent" processingStrategy="synchronous">
      <poll doc:name="Poll">
        <fixed-frequency-scheduler frequency="10000"/>
        <db:select config-ref="Generic_Database_Configuration" doc:name="Select Database">
          <db:dynamic-query><![CDATA[SELECT  MessageId, MessageType,SerialNumber,CreatedOn  FROM Message order by SerialNumber asc]]></db:dynamic-query>
        </db:select>
      </poll>
      <foreach doc:name="For Each">
        <idempotent-message-filter idExpression="#[payload.SerialNumber]" doc:name="Idempotent Message">
          <in-memory-store entryTTL="120000" expirationInterval="1800000"/>
        </idempotent-message-filter>
        <logger message="#[payload.SerialNumber] == Hello this is Loggin Message == #[payload]" level="INFO" doc:name="Logger"/>
      </foreach>
    </flow>
  </mule>